QuickBooks Online 2026 New Layout: Step-by-Step CSV/QBO Import + Error Fixes (Templates Included)
QuickBooks Online 2026 New Layout: Step-by-Step CSV/QBO Import + Error Fixes (Templates Included)
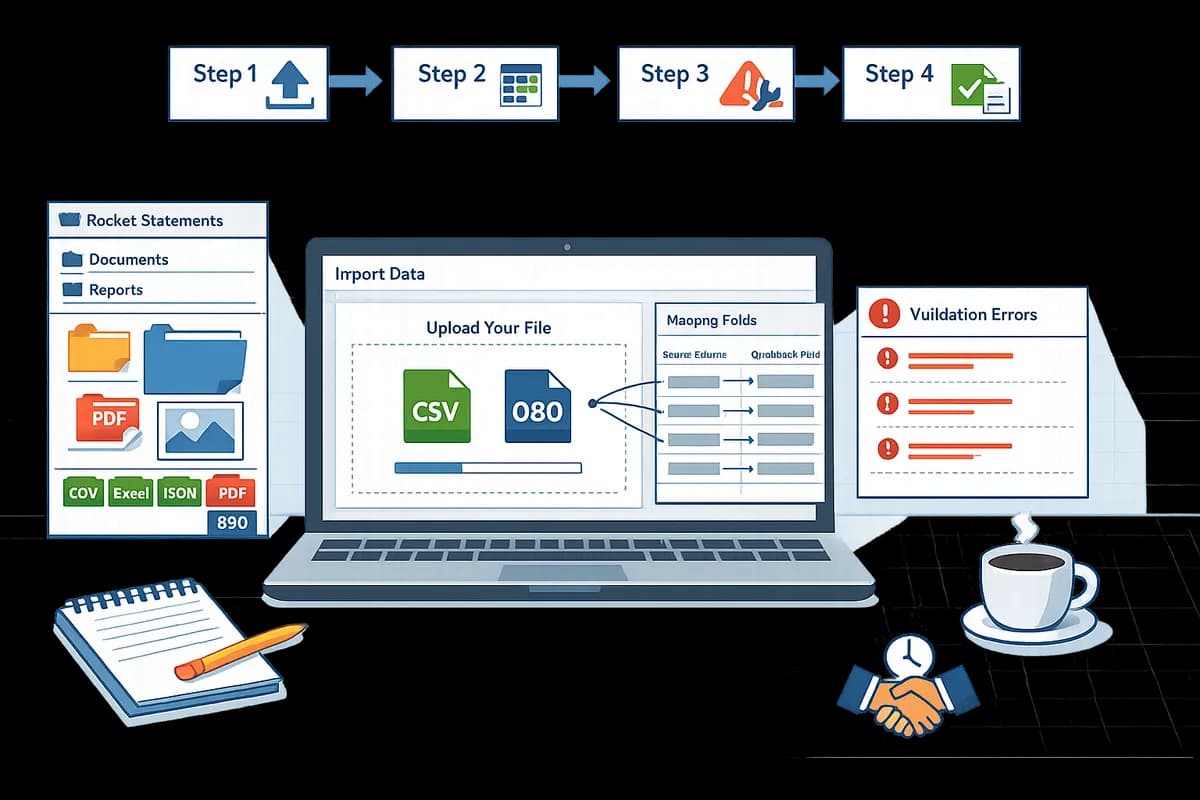
Mismatched date formats can stop a 300-line CSV import and turn a 30-minute task into hours of cleanup for accounting firms. QuickBooks Online CSV import new layout is a QuickBooks Online interface change that enforces stricter column mapping and validation rules for CSV and QBO uploads. This how-to guide shows accounting firms and bookkeepers how to import CSV and QBO files in QuickBooks Online's 2026 new layout, covering pre-import checks, import steps, templates, and fixes for the "We can’t upload your file" error. Our Rocket Statements platform converts bank PDFs and images into QuickBooks-compatible CSV and Excel, stores documents in cloud folders, and syncs transactions. See our QuickBooks Online integration and the Rocket Statements QuickBooks export checklist. Which three fields cause most upload failures?
What is the QuickBooks Online new layout and which pre-import checks stop CSV errors?
The QuickBooks Online new layout centralizes CSV and QBO uploads into a single Import center and enforces stricter header matching and preview-based mapping to reduce failed imports. That change makes pre-import validation of headers, totals, dates, signs, and duplicates the most reliable way to avoid the "We can’t upload your file" errors.
Confirm file type and layout (3-column vs 4-column) 🗂️
QuickBooks expects either a 3-column (date, description, amount) or a 4-column (date, description, deposit, payment) CSV layout depending on the data type. Use the included 3-column and 4-column templates and match QuickBooks header names exactly; a single mismatched header (for example Amount vs Payment) triggers the new layout's stricter header validation. For bank transactions you will usually use the 3-column file; for checks or split deposits use the 4-column layout so QuickBooks can distinguish credits from debits. See our QuickBooks Bank Transaction Import 2026: CSV/QBO/QFX Specs guide for required and optional headers and example mappings. Rocket Statements can export to both 3-column and 4-column formats so you can start with a file that already matches QuickBooks header names.
Run Rocket Statements pre-import sanity check ✅
Run Rocket Statements' pre-import sanity checklist to catch end-balance mismatches, incorrect sign handling, and line-count errors before uploading. The checklist verifies end balances, compares exported line counts to source statements, confirms date ranges, and flags negative/positive sign flips that frequently cause mapping failures. Perform these checks locally or use the Rocket Statements QuickBooks export checklist to automate the verification; fixing sign errors or a 1-line count mismatch before import saves hours of troubleshooting. If a balance or sign is wrong, correct the CSV and re-run the checklist so the preview screen in the new layout shows expected totals.
💡 Tip: Run the Rocket Statements sanity checklist before the full import to catch sign, date, and line-count issues early.
Verify dates, decimal separators, and encoding 📅
Ensure date formats, decimal separators, and file encoding match your QuickBooks regional settings to avoid mapping failures and transactions posting to the wrong month. Confirm whether QuickBooks expects MM/DD/YYYY or DD/MM/YYYY for your company file and export dates in that exact format. Check decimals: some banks export 1.234,56 while QuickBooks expects 1,234.56; a comma vs period mismatch will split amounts or fail mapping. Save the CSV as UTF-8 to avoid hidden characters; Rocket Statements can export files with regional date and number formatting to match your QuickBooks settings.
Check for duplicates, memos, and file naming conventions 📝
Remove duplicate lines, standardize memo/payee fields, and use disciplined file names including the source date range to reduce duplicate creation and speed reconciliation. QuickBooks matches on date, amount, and memo; inconsistent memos or truncated payee text cause the program to create duplicates instead of matching. Example filename pattern to use: BankName_2026-01-01_2026-01-31.csv so you and your team know source and range at a glance. Rocket Statements stores exports in cloud folders and can keep consistent file names and memo normalization across multi-month exports to reduce manual cleanup.
Save a sample file and run a small test import ✅
Always import a 20–50 row sample that includes edge cases to confirm mapping and avoid long rollbacks on full imports. Create a sample that covers checks, refunds, multi-line descriptions, deposits, and negative amounts. Steps: 1) Export 20–50 rows that include the edge cases; 2) Upload to the Import center and complete the preview mapping; 3) Confirm that dates map to the correct columns and totals match the preview; 4) If anything fails, correct the CSV and repeat the test. Expected outcome: the sample imports cleanly and preview totals match source balances. Rocket Statements makes it fast to produce representative samples from full exports so you can iterate until the mapping preview shows the correct results.
How do I import CSV or QBO into QuickBooks Online using the new layout (step-by-step)?
Use the Import center in QuickBooks Online's 2026 new layout to upload your CSV or QBO, map headers, preview a sample, and complete the final import. The new flow shows a dedicated header-mapping screen before the preview, so correct mapping is the single biggest factor that prevents errors like "We can't upload your file."
Open the Import center and choose the data type 🗂️
Open the Import center from the left-hand menu and select the data type you need (Bank transactions, Invoices, Checks, or Products/Services).
- Log in to QuickBooks Online and click the left navigation menu.
- Click Import center. The new layout groups all upload types in one place rather than scattered menus.
- Pick the correct data type for your file. Selecting Bank transactions for bank exports and Checks for check batches avoids category and account mis-matches.
- If you exported from Rocket Statements, pick the matching data type to preserve header names and reduce manual fixes. For header details and required fields, see the QuickBooks Bank Transaction Import 2026: CSV/QBO/QFX Specs guide.
Expected outcome: The Import center displays an Upload button and a dropdown to choose the data type and upload path.
Select file and choose the New Layout upload path 📤
Click Upload, choose your CSV or QBO file, and confirm the New Layout import flow when prompted.
- Click Upload and pick the file from your drive. QuickBooks accepts .qbo and .csv in the new flow.
- When QuickBooks prompts, select the New Layout path so you reach the header mapping screen before the preview.
- For CSVs, ensure the file is UTF-8, uses ".csv" extension, and has a single worksheet exported.
- If Rocket Statements produced the file, choose the QuickBooks-compatible export to avoid renaming headers and fixing sign conventions. Learn more in Can Rocket Statements export QuickBooks-compatible files? CSV for QBO and Spreadsheet Sync mappings explained (2026).
Common error and quick fix: "We can't upload your file" often means bad encoding or unexpected headers. Re-export from Rocket Statements with the QuickBooks option or save the CSV as UTF-8 and retry.
Map columns using the mapping cheat sheet 🧭
Map each CSV column to the exact QuickBooks field names shown on the header mapping screen using the mapping cheat sheet.
- On the header mapping screen, match each CSV column to a QuickBooks field. Date maps to Date, Payee to Payee, Amount to Amount/Deposit/Payment.
- Use this quick mapping table for common Rocket Statements headers:
| Rocket Statements header | QuickBooks field |
|---|---|
| Date | Date |
| Description or Payee | Payee |
| Amount | Amount or Payment/Deposit (choose based on sign) |
| Check # | Check No |
| Memo | Memo |
- For split transactions, map separate debit and credit columns explicitly to Deposit and Payment fields.
- If dates fail to parse, change the date format option in the mapping screen or normalize dates in the CSV to mm/dd/yyyy. See the Pre-import sanity check for RS → QuickBooks for a line-by-line checklist.
Expected outcome: All required fields show mapped values with no unmapped required headers in the preview.
Use Rocket Statements export options for QuickBooks compatibility ⚙️
Use Rocket Statements' QuickBooks-compatible export option to produce files that match QuickBooks' expected header names and sign conventions. Rocket Statements is a platform that converts PDFs and images into spreadsheets and produces QuickBooks-ready CSV and QBO exports.
- In Rocket Statements, choose the QuickBooks or QBO export preset before downloading. That preset renames headers and sets positive/negative signs to QuickBooks conventions.
- For multi-account or multi-currency exports, use Rocket Statements' folder and file naming controls so each CSV maps to a single QuickBooks bank account.
- Export a small sample file from Rocket Statements, then run steps 2–5 in QuickBooks to confirm mapping.
- If you need setup details or security info, visit Rocket Statements QuickBooks Online Integration for encryption and trial options.
Expected outcome: Downloaded file uses QuickBooks header names and requires minimal mapping in the Import center.
⚠️ Warning: Multi-account exports in a single CSV create mapping conflicts. Export one account per file or separate with Rocket Statements folder exports.
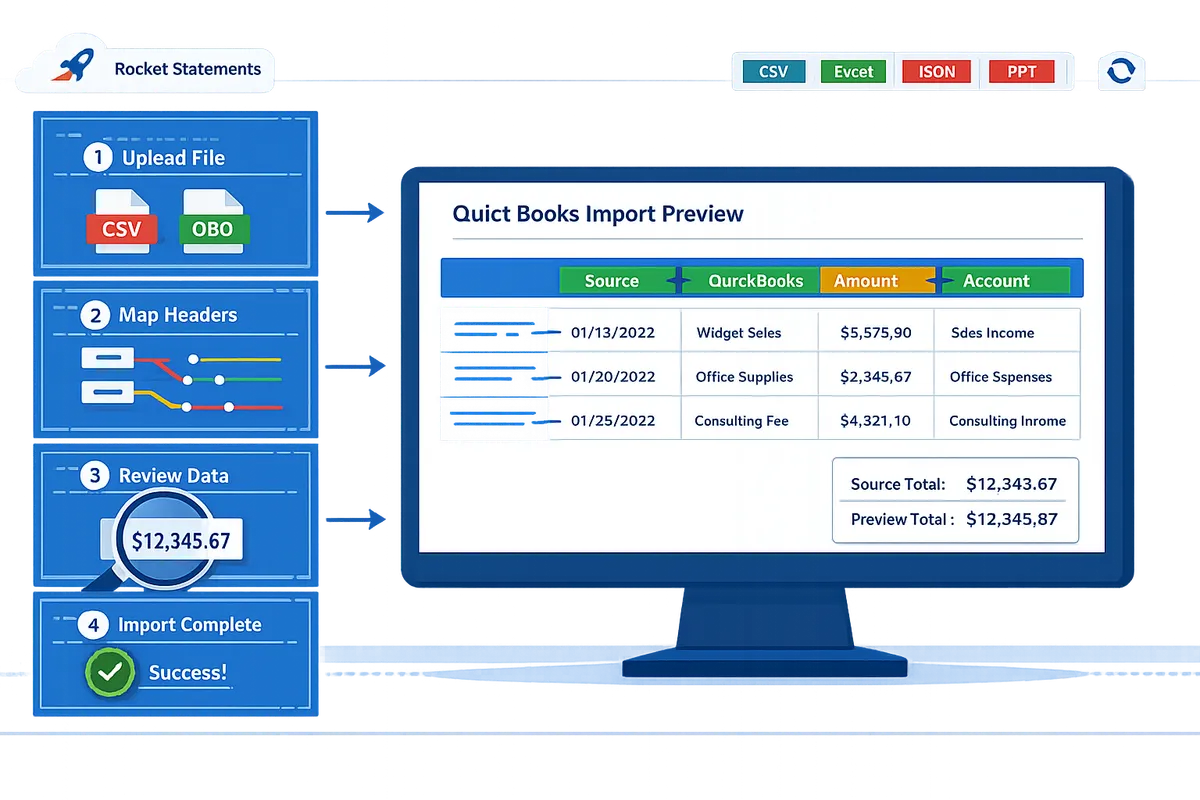
Preview, correct mapping, and run a sample import 🔍
Use the preview pane to validate dates, amounts, and mapped fields, then run a 10–50 line sample import to verify how QuickBooks posts the data.
- After mapping, open the preview pane and scan 10–20 rows for parsed dates, payees, and signs.
- Correct any mapping mismatches directly from the preview. Change the mapped field for a column and re-preview.
- Import a small sample set, then check the Banking and Expenses pages for transaction type, account, and cleared status.
- If amounts appear reversed, switch Amount mapping to Payment or Deposit as appropriate and re-run the sample.
💡 Tip: Always run a 10–20 line sample import and reconcile those lines before final import. This catches sign errors and header misses without adding cleanup work.
Expected outcome: Sample transactions appear in Banking/Expenses with correct payees, dates, and amounts.
Import checks from CSV into QuickBooks Online (checks-specific) ✍️
Map check-specific fields (Date, Payee, Check Number, Memo, Amount) exactly and treat amounts as payments so QuickBooks records checks as expenses.
- Include columns: Date, Payee, Check Number, Memo, Amount, and optionally Cleared status.
- On the mapping screen map Check Number to Check No and Amount to Payment or Expense. QuickBooks treats checks as expenses by default.
- For split-check entries, use separate lines with the same Check Number and assign accounts per line; ensure the total of splits equals the Check amount.
- If QuickBooks posts a deposit instead of a check, remap Amount to Payment and re-import the sample. Rocket Statements can export checks-ready CSVs to reduce these errors.
Expected outcome: Checks import as expense records with Check No populated and amounts shown as payments.
Finalize import and reconcile in QuickBooks ✅
Complete the import, then reconcile the imported transactions against the bank statement or account balance immediately to catch missing or duplicate lines.
- Finish the import flow and note the import summary line counts.
- Compare imported line count and end balance against your source file or Rocket Statements export summary.
- Run QuickBooks reconciliation for the statement date range or search for duplicates by payee and amount.
- Save the corrected CSV template and mapping choices. Store the files in Rocket Statements folders so future exports use the same naming and reduce manual prep.
Expected outcome: Imported transactions match the source line count and the account reconciles with no unexpected duplicates.
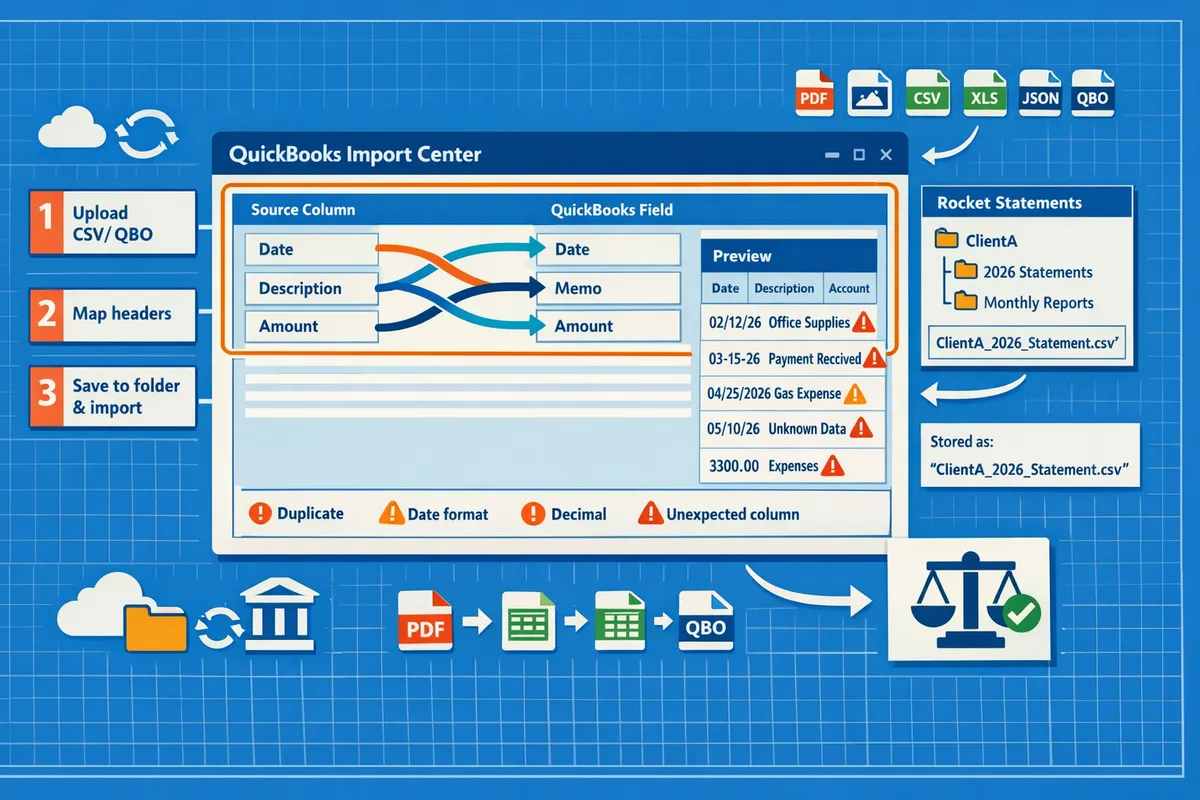
What are the most common QuickBooks CSV import errors and how do I fix them?
Header mismatches, file encoding, date and decimal formats, unexpected columns, file-size limits, and duplicate rows cause most QuickBooks CSV import failures. This section lists the specific error messages you will see, the root cause for each, and step-by-step remediation flows that fix the majority of failed imports. Follow the checks below before importing to avoid hours of cleanup and rework.
🔧 Fixing the "We can’t upload your file" QuickBooks CSV fix
The "We can’t upload your file" message usually means QuickBooks rejected the file because of unexpected headers, unsupported columns, or non-UTF-8 encoding. To resolve this error quickly, follow these steps:
- Open the CSV in Excel or Google Sheets and remove empty columns, footers, or bank summary rows that sometimes appear at the bottom of exported statements. Expected outcome: file contains only transaction rows and header row.
- Ensure header text matches QuickBooks field names (Date, Description, Amount, etc.). Remove extra punctuation, line breaks, and hidden characters. Expected outcome: QuickBooks preview maps columns automatically or shows correct field names.
- Re-save as UTF-8. In Excel: File > Save As > CSV UTF-8 (Comma delimited). In Google Sheets: File > Download > Comma-separated values (CSV). Expected outcome: encoding errors disappear and upload proceeds past the initial step.
- If the file still fails, open the first 10 rows and compare them to QuickBooks examples in the import preview. Remove any columns QuickBooks flags as unsupported.
For guidance on acceptable headers and templates, see our QuickBooks Bank Transaction Import 2026: CSV/QBO/QFX Specs guide. For files coming from PDFs, you can use Rocket Statements to produce QuickBooks-compatible exports and avoid many of these issues. See our FAQ on whether Rocket Statements exports QuickBooks-ready files for mapping tips.
🧩 Resolve header and mapping mismatches
Header mismatches create blank or misaligned preview columns and force manual remapping. Fix headers by matching QuickBooks exact field names, using the correct column order for the data type, and removing stray characters.
Steps:
- Compare your CSV header row to the column list in the QuickBooks import preview or to the templates in our QuickBooks Bank Transaction Import 2026 guide. Expected outcome: you can rename headers to an exact match.
- Standardize header capitalization and remove non-breaking spaces or quotes. QuickBooks matches text literally in the new layout preview. Expected outcome: QuickBooks maps fields automatically or reduces manual remaps to one or two columns.
- For recurring import formats, save a template with exact headers. If you use Rocket Statements, pick the QuickBooks export preset so your headers align without manual edits. Also run the Pre-import sanity check for RS → QuickBooks before importing.
🌍 Handle date format and regional decimal problems
Date and decimal formats must match the QuickBooks company locale or amounts and dates will import incorrectly. To fix these issues, either reformat the CSV to the company locale or temporarily change QuickBooks company settings to accept your format.
Steps:
- Check QuickBooks company language and region settings to confirm expected date format (for example MM/DD/YYYY vs DD/MM/YYYY). Expected outcome: you know which date format QuickBooks will accept.
- Reformat date columns in your spreadsheet to the required format using spreadsheet formatting or the TEXT function. Confirm sample rows in QuickBooks preview. Expected outcome: dates land in the correct transaction date field.
- Normalize decimals: remove comma decimal separators or thousands separators from amount cells if QuickBooks expects a period decimal. Use Find/Replace only on the amount column to avoid corrupting descriptions. Expected outcome: amounts import as positive/negative numbers, not text.
- To avoid repeated reformatting, export localized files from Rocket Statements using the QuickBooks export options described on our QuickBooks Online Integration page.
📤 Split large files and respect row limits
Very large CSV uploads can fail because of QuickBooks row or file-size restrictions, so split imports into smaller, tracked segments. Splitting prevents timeouts and makes errors easier to isolate.
Steps:
- Determine a safe row size by testing a 500-row sample import. Expected outcome: you discover a working batch size for your company file.
- Split the master CSV by date range, account, or statement page. Name files with a consistent pattern (clientname_YYYYMM_account_part1.csv). Expected outcome: you can track which segments completed and which need rework.
- Import segments sequentially, verifying balances after each batch to simplify reconciliation. Use Rocket Statements folders to store and re-export segmented files without repeating OCR or manual cleanup. For a full process example, see our PDF Bank Statements to QuickBooks in Minutes guide.
🔁 Fix duplicates and reconciliation mismatches
Duplicates typically appear when transaction IDs, check numbers, or identical payee/date/amount combinations repeat across imports and QuickBooks does not flag them as the same entry. Prevent duplicates by checking keys and using a sample import first.
Steps:
- Run a sample import of 20–50 rows to confirm QuickBooks' behavior on duplicates. Expected outcome: you see whether QuickBooks creates a duplicate or merges transactions.
- Identify duplicate keys (transaction ID, check number, reference) in the CSV and remove or update them before bulk import. If you cannot change IDs, import only new-date ranges. Expected outcome: no repeated transactions after import.
- Reconcile balances after each batch to catch mismatches early. Use the Pre-import sanity check for RS → QuickBooks to verify end balances and line counts before import.
⚠️ Warning: Always export a backup of QuickBooks data or use a limited sample import before applying large corrections, so you can recover quickly if mapping corrections create unexpected results.
☁️ Use Rocket Statements to reduce manual fixes and manage documents in the cloud
Rocket Statements converts PDFs and images into QuickBooks-ready CSV or QBO files, stores exports in organized folders, and lets you re-export corrected files without repeating OCR. Use these capabilities to remove repetitive cleanup tasks and reduce the chance of import errors.
How to use Rocket Statements for imports:
- Upload PDFs or images and choose the QuickBooks export preset. Expected outcome: the platform returns a file with headers and formatting aimed at QuickBooks' new layout.
- Run the Pre-import sanity check for RS → QuickBooks checklist to validate balances, line counts, date formats, and duplicates before you hit import. Expected outcome: you catch the most common issues before QuickBooks does.
- If you need a different locale or mapping, re-export a corrected file from the same folder without repeating OCR. Rocket Statements also supports live transaction sync for ongoing feeds that match QuickBooks formatting.
For mapping details and when manual edits still matter, see our Can Rocket Statements export QuickBooks-compatible files? FAQ and the QuickBooks Bank Transaction Import 2026 specs guide for required and optional headers.
Frequently Asked Questions
This FAQ answers the most common questions about QuickBooks Online CSV import new layout, templates, checks mapping, and common error messages. Each answer gives a direct fix or step so you can test and complete imports faster. Use the links below to jump to template examples, pre-import checks, and Rocket Statements export options.
How do I import checks from CSV into QuickBooks Online? 🧾
Map Date, Payee, Check Number, and Amount to QuickBooks fields and use separate deposit/payment columns so outflows import as payments and inflows as deposits.
- Prepare a 4-column CSV: Date | Payee | Check Number | Payment (positive numbers only). Expected outcome: QuickBooks shows these as checks in the Banking Import preview.
- Open the Import center and choose Checks (or Bank Transactions if checks option not shown). On the mapping screen, set CSV Date -> Date, CSV Payee -> Payee, CSV Check Number -> Check No., and CSV Payment -> Amount (Payment side). Expected outcome: preview lists checks with a check number column.
- Test with a 20–50 row sample and confirm balances match bank statement end balance. If amounts appear on the wrong side, swap Deposit/Payment mapping and re-run the sample. Rocket Statements can export checks in QuickBooks-ready CSV/QBO format and run a pre-import sanity checklist to prevent header and sign errors. See the Rocket Statements QuickBooks integration guide for export presets and mapping tips.
💡 Tip: Test checks with 20–50 rows first; a small failed import saves hours of cleanup.
Why does QuickBooks say 'We can’t upload your file' and how do I fix it?
That message means QuickBooks rejected the file because headers, encoding, or unexpected columns do not match the required template. Fix checklist: re-save the CSV as UTF-8, remove blank or extra columns, and rename headers to match QuickBooks sample (for example Date, Description, Deposit, Payment). Expected outcome: the Import center accepts the file and advances to the mapping preview. Also check for stray characters (hidden BOM), inconsistent decimal separators, or merged cells from Excel. If you still see the error, run a short export from Rocket Statements in QuickBooks-compatible mode; its pre-import checklist highlights header mismatches and sign issues and often fixes the problem before you upload. For step-by-step format differences and CSV specs, see our bank transaction import guide.
Which CSV template should I use for bank transactions vs checks?
Use a 3-column template (Date, Description, Amount) for single-line bank transactions and a 4-column or expanded template (Date, Description, Deposit, Payment or Check Number) for checks and split transactions. Practical examples: use the 3-column layout for downloaded card activity or simple deposits where each row has a single signed amount. Use the 4-column layout when a row needs an explicit deposit and payment column (common for check imports and cleared check records) or when you must supply a Check Number column for vendor payments. Expected outcome: QuickBooks mapping screens will match automatically when headers align exactly. Download the article templates included with this guide and compare the two templates in the QuickBooks Bank Transaction Import 2026 for required headers and optional fields.
How does the QuickBooks Online new layout change mapping compared with the old flow?
The new layout introduces a mandatory header-mapping screen before the preview and enforces stricter field validation than the old flow. Impact for bookkeepers: the new flow reduces incorrect auto-mapping, but it requires exact or closely matching header names or a consistent export preset. Expected outcome: fewer silent mis-mapped columns at import, but more time spent ensuring headers match before upload. If you previously relied on QuickBooks to guess columns, plan a quick header-normalization step. Rocket Statements offers a QuickBooks export preset so your CSV headers match the new layout’s expectations and skip manual header edits. For a detailed before/after comparison and mapping cheat sheet, see our full import specs guide.
Do I need Rocket Statements to prepare files for QuickBooks imports?
You do not strictly need Rocket Statements, but using it reduces manual cleanup by converting PDFs and images into QuickBooks-compatible CSV or QBO and running a pre-import sanity check. Scenario example: a firm converting 50 PDF pages often spends 3–6 hours fixing columns and dates; exporting with Rocket Statements typically removes much of that manual work by normalizing dates, signs, and headers before you upload. Expected outcome: fewer "We can’t upload your file" errors and faster trial imports. See our walkthrough on converting PDF bank statements to QuickBooks-friendly files and the export compatibility article for mapping details and which fields still require a manual pass.
What regional date and number formats cause the most import failures?
Day/month vs month/day date formats and comma vs period decimal separators cause the most import failures. Concrete fixes: reformat dates to the QuickBooks company locale (for example MM/DD/YYYY for US companies) and standardize decimals to match QuickBooks settings (use a period for decimals if QuickBooks expects that). Expected outcome: date and amount columns import cleanly and line balances match the bank. If you work with multi-country clients, convert dates to ISO-style YYYY-MM-DD or to the company locale before saving as CSV. Rocket Statements can normalize date and decimal formatting during export so the CSV matches the target QuickBooks company locale.
Finish imports with a short checklist and a clear next step.
You now have a practical path to import CSV and QBO files into QuickBooks Online's new layout: run the pre-import checks, apply the provided templates, and fix the common errors that block uploads. QuickBooks Online CSV import new layout accepts files when headers, date formats, debit/credit signs, and line counts match the expected mappings.
Rocket Statements is a platform that helps users save time and money by automating the process of converting their statements into spreadsheets as well as manage their documents in the cloud. The product has the following features:
- Convert their PDF and image statements into spreadsheets
- Manage their documents in the cloud with folders and subfolders
- Sync live transactions data from bank accounts
- Export their statements into CSV, Excel, JSON, and PDF files
- Export their statements into QuickBooks compatible files
💡 Tip: Run the Pre-import sanity check for RS → QuickBooks before attempting an import to avoid the most common rejects.
Start a free trial of Rocket Statements and create your first QuickBooks export from the QuickBooks Online Integration page. Subscribe to our newsletter for import templates, troubleshooting tips, and updates.