QuickBooks Desktop 2026: How to Import Bank and Credit Card Transactions via .QBO/.QFX/.OFX (Web Connect Setup, Date Ranges, and Error Fixes)
QuickBooks Desktop 2026: How to Import Bank and Credit Card Transactions via .QBO/.QFX/.OFX (Web Connect Setup, Date Ranges, and Error Fixes)
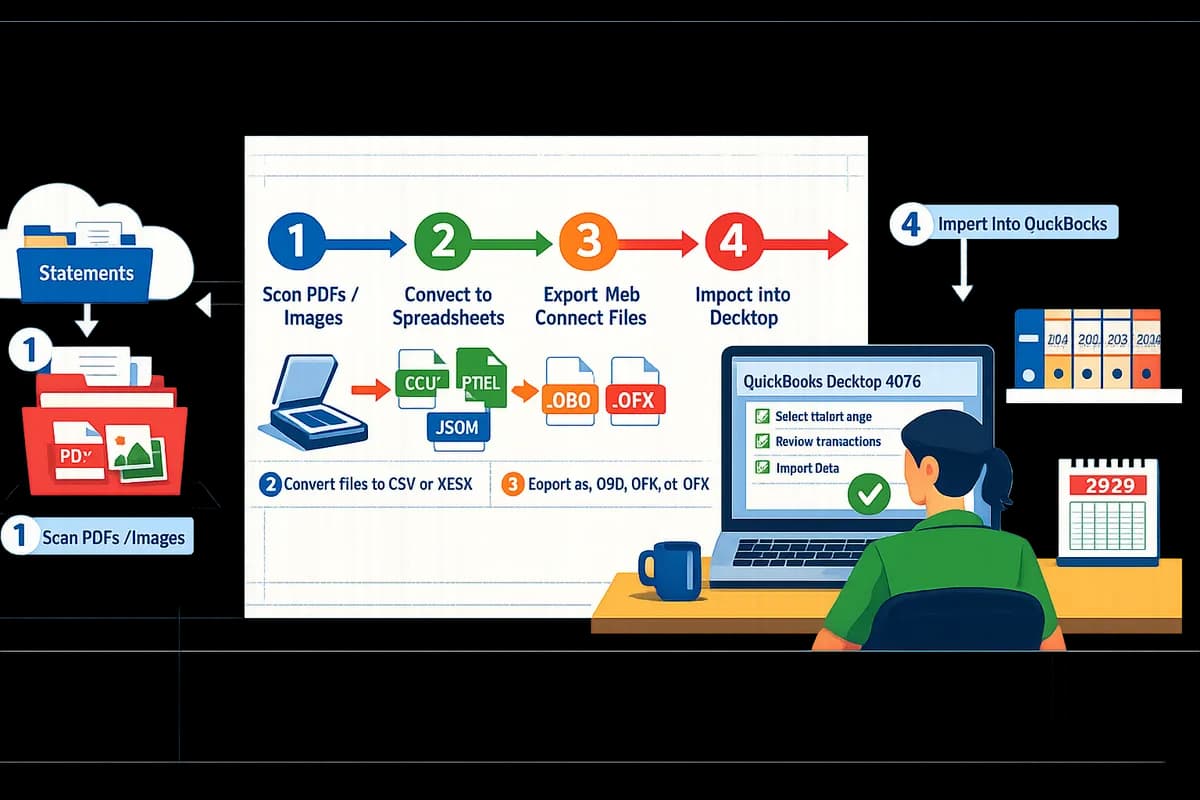
A single misformatted Web Connect file can add four hours to month-end reconciliation for small accounting firms. How to import bank transactions into QuickBooks Desktop 2026 is a step-by-step guide that explains using Web Connect files (.QBO/.QFX/.OFX) to import bank and credit card transactions and fix common errors. Our website shows how Rocket Statements converts PDF and image statements into spreadsheets, exports QuickBooks-compatible files, syncs live transactions, and stores documents in cloud folders to cut manual mapping and file hunting. The guide covers Web Connect setup, date ranges, and common parse errors, with links to our bank statement converter, QuickBooks sync troubleshooting, and related posts on our blog. Use the checklist to avoid duplicate imports and fix the three errors most teams miss.
Prepare files, accounts, and backups before you import into QuickBooks Desktop 2026
Prepare files and accounts by verifying your Desktop build, backing up your company file, converting statements to Web Connect formats, and defining non-overlapping date ranges before import. These steps reduce duplicate entries, mapping errors, and reconciliation time. Follow the checklist and the four action steps below before you run any Web Connect import.
Confirm QuickBooks Desktop release and create backups. 🔒
Verify your QuickBooks Desktop 2026 edition and build number and make both a local backup and a portable copy before importing. How to check. Open QuickBooks, go to Help > About QuickBooks (or Help > Product Information) to confirm the 2026 build and whether you run Pro, Premier, or Enterprise. Menu paths for imports can differ by edition and build, so matching the UI avoids confusion when you follow later steps.
Create two backups. Use File > Back Up Company > Create Local Backup for a full copy, then use File > Create Copy > Portable Company File to produce a portable .QBB you can restore quickly. Expected outcome: you can fully restore the file if an import creates duplicates or corrupts lists. ⚠️ Warning: Skipping backups risks duplicate records and time-consuming manual cleanups that often require a restore to undo.
Understand Web Connect formats (.QBO, .QFX, .OFX). 📁
Web Connect is the group of file formats (.QBO, .QFX, .OFX) that QuickBooks Desktop accepts for bank and card transaction imports. What each file means. .QBO is Intuit’s Web Connect format commonly issued by U.S. banks. .QFX is Quicken’s export that some banks provide for North American customers. .OFX is the open standard many international banks use. Banks and card issuers differ on which they publish; check the bank’s download page for available types.
How to tell a Web Connect file. Confirm the file extension first (.qbo/.qfx/.ofx). If you open the file in a text editor, headers such as OFX or QFX usually appear near the top; CSV and PDF lack those tags. Rocket Statements can convert PDFs and images into QuickBooks-compatible .QBO and .OFX files when the bank only supplies PDF or when you receive emailed statements. For technical details about accepted headers and field expectations, see our QuickBooks Bank Transaction Import 2026: CSV/QBO/QFX Specs guide.
Convert PDFs or spreadsheets into QuickBooks-compatible files. ⚙️
Use Rocket Statements to convert PDF or image statements into .QBO, CSV, or Excel exports so you avoid manual rekeying and format errors before import. Conversion options and expected outcomes. Rocket Statements can export directly to .QBO for Desktop imports or produce CSV/Excel you can review and then convert. Typical workflow: upload a PDF, run OCR, choose QuickBooks (.QBO) or CSV output, then download the converted file. Conversion usually surfaces OCR errors in payee names or amounts; expect to run a quick quality pass.
Quality checks to run after conversion (one-to-one row per transaction):
- Verify dates match bank posting dates, not statement description dates.
- Confirm debit/credit signs and totals.
- Spot-check 10% of transactions for correct payee names and remove merged rows where the OCR skipped line breaks. For implementation details and mapping examples, see Can Rocket Statements export QuickBooks-compatible files? which walks through common conversion issues users report in our community.
Run a pre-import checklist to prevent duplicates and map accounts. ✅
Confirm the target QuickBooks account, set strict date ranges that do not overlap prior imports, and prepare a payee/category mapping plan before you import. Checklist items to verify before pressing import:
- Last imported transaction date in QuickBooks for this account.
- Whether an active online bank feed exists for the same account (feeds can cause duplicates).
- If the file contains multiple card numbers or accounts, split into one file per QuickBooks bank/card account.
- Your duplicate-protection method (example: import only transactions after last reconciled date or use unique transaction IDs where available).
Recommended test import routine:
- Import a single month of transactions into a temporary bank account in QuickBooks.
- Reconcile that month to confirm mapping and category assignments.
- If the test passes, import the full range. Rocket Statements helps here by storing statements in cloud folders and tagging the converted files with account and date metadata so you can easily track which periods you already imported. For automation workflows and CSV header requirements that speed mapping, consult our QuickBooks Bank Transaction Import 2026: CSV/QBO/QFX Specs guide and our post on Automatically Import Live Bank Transactions in 2026 for ideas on avoiding repeated manual imports.
💡 Tip: Always run a one-month test import into a temporary account to validate payee mapping and duplicate settings before importing a large range.
Rocket Statements' export options include reconciliation notes and per-transaction source links that speed this verification step and reduce manual cross-checking.
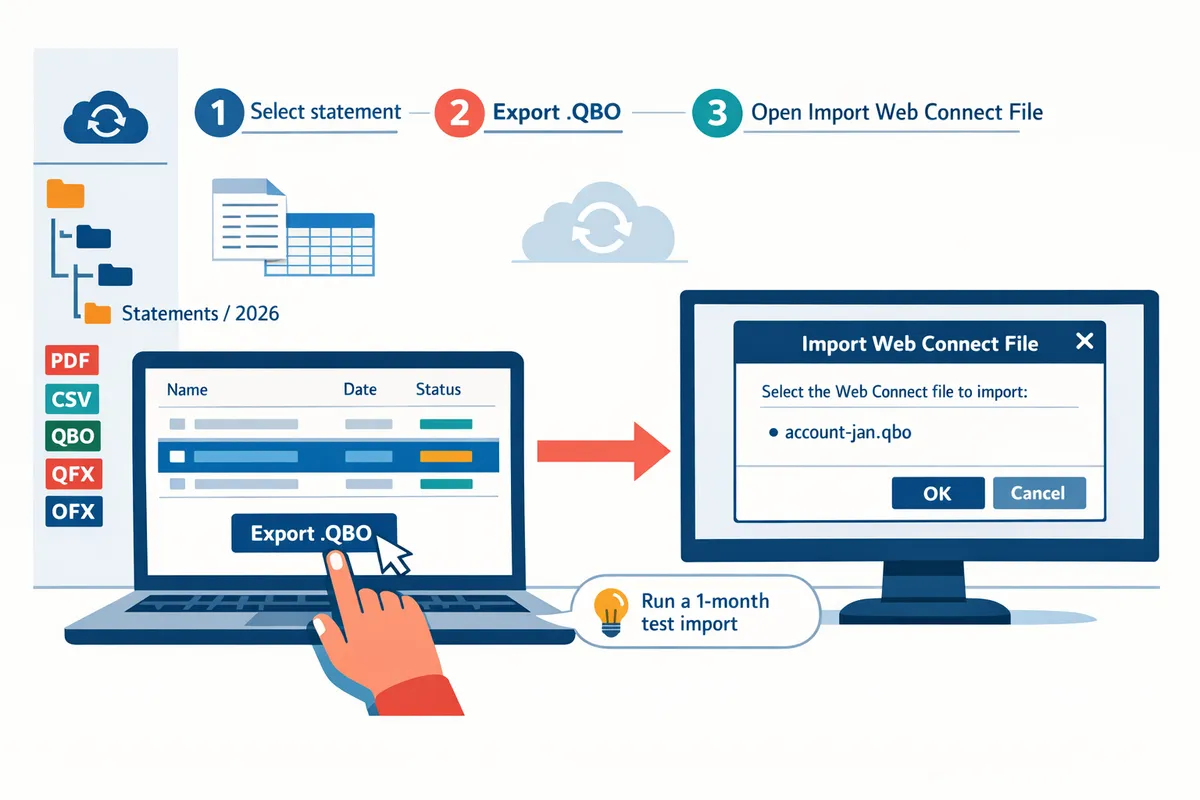
Import Web Connect files into QuickBooks Desktop 2026 using the updated menu flow
Follow QuickBooks Desktop's File > Utilities > Import > Web Connect Files flow to import .QBO, .QFX, or .OFX files. This section gives the exact menu paths, prompts you will see, and the checks to run after each import so you avoid duplicate entries and reconcile cleanly.
Step 1 — Open the Web Connect importer in QuickBooks 🖥️
Start QuickBooks and open File > Utilities > Import > Web Connect Files to launch the importer. This is the updated menu flow inside QuickBooks Desktop 2026 and the import dialog appears immediately after you pick a file.
- Open the company file you will import into and confirm you have a recent backup saved. Expect QuickBooks to prevent multi-user edits during import.
- Menu path for most editions: File > Utilities > Import > Web Connect Files. For QuickBooks Accountant and Enterprise editions the same path applies; if you do not see Import, check your user permissions or Admin mode.
- QuickBooks will show an "Import Web Connect File" dialog where it asks which QuickBooks account to connect to. Prepare to pick an existing bank/credit-card account or create one.
Rocket Statements can produce .QBO/.QFX/.OFX files ready for this dialog, which reduces the manual reformatting you would otherwise do. If you used Rocket Statements, open the exported QBO file directly from the Rocket Statements folder to avoid accidental downloads with altered extensions.
Step 2 — Choose the correct file and map to the right account 📂
Select the Web Connect file and map it to the correct QuickBooks bank or credit card account before importing. Choosing the wrong account merges transactions into the wrong register and creates a reconciliation mess.
- Click Browse and select the .QBO, .QFX, or .OFX file. QuickBooks reads the account number in the file and then prompts you to link to an existing QuickBooks account or create a new one.
- If QuickBooks offers to create an account, pause. Create a new account only when the account in the file is genuinely absent from your chart of accounts. Creating duplicates is harder to fix than moving a small batch of transactions.
- For multiple-account files: import sequentially by account. If a file contains transactions for more than one real-world account, split it first. Rocket Statements can export separate Web Connect files per account so you import one QuickBooks account at a time.
See our mapping and export guidance in the QuickBooks-compatible export FAQ for practical tips on preparing files with Rocket Statements.
Step 3 — Set date ranges and import partial files safely 📆
Split large files into smaller date-range batches, such as quarterly or 12-month chunks, to reduce timeout risk and make duplicate checks easier. Smaller batches let you verify totals quickly and re-run a single chunk if an error occurs.
- If your source covers multiple years, export or split the file into date-limited batches before import. Aim for quarterly batches for high-transaction accounts and up to 12-month batches for low-activity accounts.
- In QuickBooks there is no built-in date filter on import, so produce files that already contain only the target dates. Rocket Statements can export date-filtered QBO files so you do not import overlapping windows.
- To avoid duplicates, start the earliest chunk at the day after your last cleared statement date. Record the last imported date in client notes so future imports align precisely.
For a fuller comparison of Desktop vs Online import formats and recommended batch sizes, see our CSV/QBO/QFX specs and Desktop playbook.
Step 4 — Accept the import and review the account register before reconciling 🔍
Open the account register immediately after import and verify totals, payees, and splits before you run reconcile. Immediate review catches duplicates and mapping errors that accumulate during month-end close.
- Check that the number of imported transactions matches the source file. Compare the file total to the register subtotal and flag any missing items.
- Verify payees and categories. QuickBooks may assign a generic payee; edit common merchant names in bulk where possible to avoid mismatches during reconciliation.
- Inspect for duplicate entries and unexpected rounding differences. If you find duplicates, remove the extra rows or restore the backup and re-import the corrected file.
💡 Tip: Attach the originating statement or Rocket Statements reconciliation notes to the QuickBooks client file or transaction attachments. That makes audits faster and documents exactly which source file the batch came from.
Rocket Statements' export options include reconciliation notes and per-transaction source links that speed this verification step and reduce manual cross-checking.
Step 5 — Reconcile the imported transactions and finalize the batch ✔️
Use QuickBooks Reconcile with the statement ending date and ending balance to match imported items and record any adjustments. Reconciling immediately after import prevents drift between the bank and ledger and creates a clean audit trail.
- Go to Banking > Reconcile, select the account, enter the statement date and ending balance, and click Continue.
- Tick the imported transactions that clear against the statement. Unmatched items either belong to a different statement period or require editing.
- If you must record an adjustment, document the reason in the Reconcile window memo and attach the source statement. Keep a note of any imported batch IDs from Rocket Statements to trace changes later.
If reconciliation shows missing transactions, export a narrow date-range QBO from Rocket Statements and re-import only the missing window to avoid reprocessing the entire year.

Related reading: review the Desktop import specs and no-code automation workflows in our QuickBooks Bank Transaction Import 2026 guide, and consult the QuickBooks-compatible export FAQ if you need to adjust Rocket Statements mappings.
Diagnose and fix import errors, prevent duplicates, and compare Desktop vs Online import choices
This section provides troubleshooting steps and safeguards to fix common Web Connect issues and avoid wasteful reconciliation.
Resolve common Web Connect import errors and codes 🛠️
Start by matching the exact QuickBooks error message to a targeted corrective action such as re-exporting the statement, correcting the file header, or aligning the bank ID. QuickBooks Desktop Web Connect errors usually fall into three buckets: file corruption or encoding issues, header/format mismatches, and account/bank ID mismatches. The following steps fix the most frequent failures and state the expected outcome for each.
- Identify the error text. Record the exact message (for example: "Unable to read OFX file," "Bank ID does not match") and the filename. Expected outcome: specific error mapped to a troubleshooting path.
- Check file corruption and encoding. Open the .QBO/.OFX/.QFX in a text editor and confirm the header lines contain valid key:value pairs (e.g., OFXHEADER:100). If the file shows binary garbage or truncated lines, re-download or re-export from the bank. Expected outcome: a readable file that QuickBooks can parse.
- Fix header and tag mismatches. If tags or header values differ from QuickBooks expectations, reconvert the file with Rocket Statements or re-export using the bank's Web Connect option. Rocket Statements corrects common header inconsistencies during conversion. Expected outcome: an accepted import file.
- Resolve bank ID or account mismatch. Confirm the bank ID in the file matches the QuickBooks account you selected. If the bank provided the wrong ID, contact the bank and request a correct Web Connect file. Contact QuickBooks support only when QuickBooks rejects a file that displays correct headers and bank IDs. Expected outcome: file imports into the intended company account.
For more format details and troubleshooting examples, see our guide on QuickBooks-compatible export and mapping in "Can Rocket Statements export QuickBooks-compatible files?". Use Rocket Statements to reconvert problem files when manual header edits risk further corruption.
Prevent and clean up duplicate transactions after import 🧹
Use QuickBooks' matching tools plus a manual verification workflow that sorts by date and amount to safely identify and remove duplicates. QuickBooks Desktop flags some duplicates automatically, but you should always run a manual sweep and keep a backup before any mass delete or merge.
- Backup your company file. Always create a dated backup before cleanup. Expected outcome: recoverable state if removals go too far.
- Narrow the search. Sort bank register entries by date, then amount, then payee to surface exact-amount duplicates within a close date window. Expected outcome: a short candidate list for review.
- Use memorized payee patterns and the "Find Match" workflow in Bank Feeds for line-level matching. Expected outcome: matched transactions attach to the same source.
- Execute merge or delete in small batches. Verify 5–10 transactions first, then expand. Expected outcome: no legitimate transactions removed.
💡 Tip: Back up your company file before running batch delete or merge operations in QuickBooks Desktop.
Rocket Statements reduces duplicate risk by embedding source metadata and creating unique transaction IDs during conversion. That lets you trace each imported line back to the original PDF or statement folder if a reconciliation question arises.
Convert CSV or Excel to Web Connect safely 🔁
Prepare CSV/Excel columns to match QuickBooks Web Connect expectations and run a small test import before processing a full batch. Manual conversions commonly fail due to inconsistent date formats, misplaced amount signs, or shifted columns; a five-record test prevents mass errors.
- Standardize columns. Include Date, Amount, Payee, Memo, and CheckNumber where available. Format dates consistently (test the bank-export date format against QuickBooks import settings). Expected outcome: predictable mapping during import.
- Check amount conventions. Ensure deposits use the sign your target format expects (for example, positive for deposits and negative for withdrawals). A mismatch flips debits and credits during import. Expected outcome: correct credit/debit mapping.
- Test a 5-row sample. Convert five records to .QBO and import to a test company file. Confirm dates, amounts, and payees map as expected. Expected outcome: Clean sample import.
- Use Rocket Statements for bulk conversion. Rocket Statements automates column mapping, fixes common header errors, and generates QuickBooks-ready .QBO files from CSV/Excel or from PDFs/images. Expected outcome: reduced manual mapping and fewer import errors.
⚠️ Warning: Manual CSV-to-QBO conversions often misplace date formats; verify a sample import before processing a full batch.
For column templates and required headers, see the CSV/QBO spec reference in our "QuickBooks Bank Transaction Import 2026: CSV/QBO/QFX Specs" article.
Compare Desktop vs QuickBooks Online import methods 📊
Use Desktop Web Connect when you need fine-grained control over archived, multi-year statement imports; use QuickBooks Online for live bank sync and simpler error handling. The table below summarizes key trade-offs to help you choose.
| Criteria | QuickBooks Desktop (Web Connect) | QuickBooks Online (Bank Sync) |
|---|---|---|
| Setup steps | Manual download of .QBO/.QFX/.OFX and File > Utilities > Import > Web Connect Files | Connect bank feed in the Online UI; authorize account access |
| Real-time sync | No. Imports are file-based and scheduled manually | Yes. Continuous sync with near-real-time updates |
| File formats supported | QBO, QFX, OFX via Web Connect | QBO, CSV uploads; direct sync avoids files |
| Error handling | Requires manual diagnosis of file headers, bank ID, or partial imports | Online shows feed status and auto-retries; fewer file-format errors |
| Duplicate handling | Manual duplicate checks after import; Rocket Statements metadata helps reconcile | Online attempts to auto-match; duplicates still occur during outages |
| Best when | Multi-year archives, scanned PDFs, or precise control over import batches | Active daily banking, fewer archived imports, preference for automation |
Rocket Statements plus Desktop import is often the lower-risk option for large multi-year or archived imports because Rocket Statements prepares files and stores statement history in the cloud for audits. For a detailed comparison of mapping and headers, see our CSV/QBO specs guide in "QuickBooks Bank Transaction Import 2026: CSV/QBO/QFX Specs, Desktop EOL Playbook, and No-Code Automations with Rocket Statements."
When to use Rocket Statements versus manual conversion 🚀
Choose Rocket Statements when conversion volume, audit needs, or staff time costs make manual processing inefficient or risky. Decision points: if you process multiple clients or accounts and spend 3–6 billable hours per client reformatting and fixing imports, if you require cloud document folders and audit trails, or if you prefer verified exports with optional human review. Rocket Statements offers PDF-to-QBO conversion, cloud document management, live transaction sync, and export formats for QuickBooks Desktop and Online, which reduces time spent on manual column mapping and header fixes. For a full comparison of manual versus automated flows and when to choose pro converters, see QuickBooks & Xero Bank Statement Automation in 2026: Import Mapping, Error Fixes, and When to Use Free vs Pro Converters and our export mapping guide Can Rocket Statements export QuickBooks-compatible files? CSV for QBO and Spreadsheet Sync mappings explained (2026).
Next step: confirm your imports and start a Rocket Statements trial.
You now have a clear checklist for preparing Web Connect files, choosing date ranges, and resolving the most common import errors. If you followed the steps, you should now understand how to import bank transactions into QuickBooks Desktop 2026 and avoid the rejects that cost hours of cleanup.
⚠️ Warning: Back up your QuickBooks company file before importing QBO, QFX, or OFX files to avoid irreversible data changes.
Rocket Statements is a platform that helps users save time and money by automating the process of converting their statements into spreadsheets as well as manage their documents in the cloud.
The product has the following features:
- Convert their PDF and image statements into spreadsheets
- Manage their documents in the cloud with folders and subfolders
- Sync live transactions data from bank accounts
- Transform their statements into CSV, Excel, JSON, and PDF files
- Transform their statements into QuickBooks-compatible files
Start a free trial of Rocket Statements to produce QuickBooks-compatible files and run a test import with the exact QBO/QFX/OFX you need. For detailed format rules and template mappings, see our QuickBooks Bank Transaction Import 2026 guide and the FAQ on exporting QuickBooks-compatible files to help smooth the next import.