
Import Bank Transactions Into QuickBooks Online
Import Bank Transactions Into QuickBooks Online
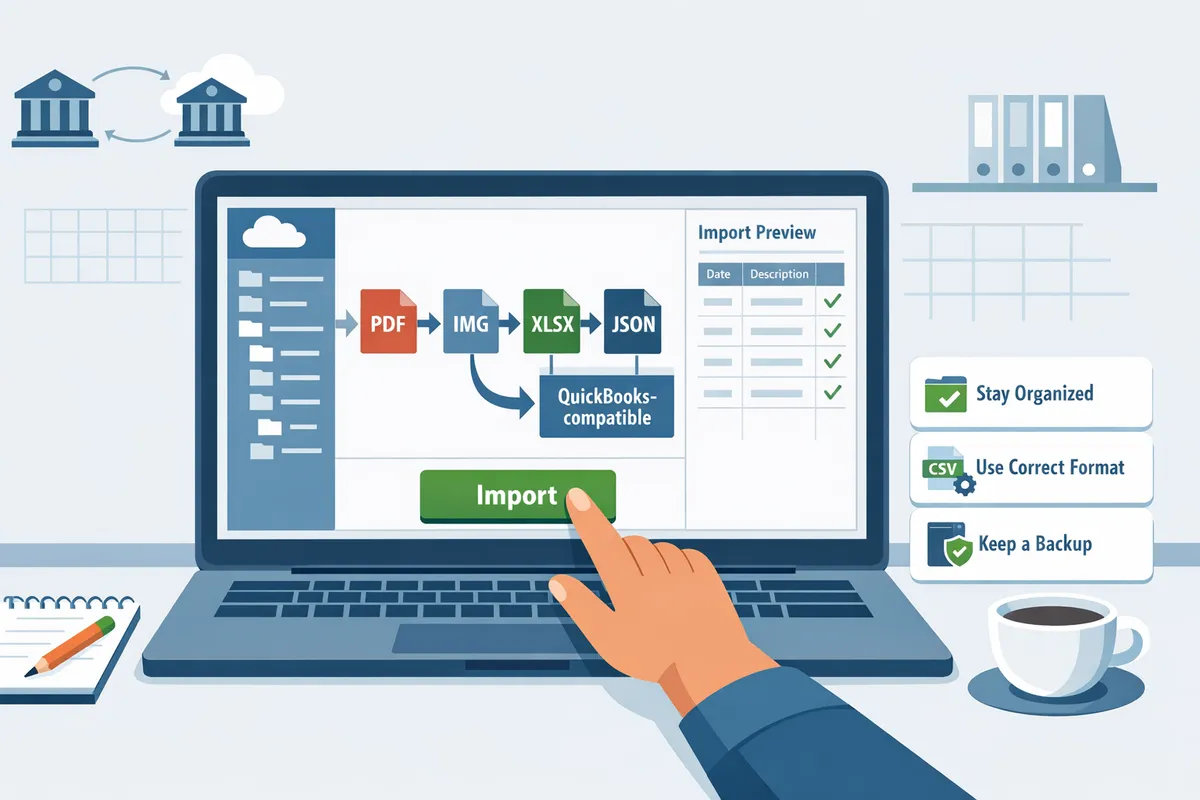
A single mismatched date when you import bank transactions into QuickBooks Online can create a month's worth of reconciliation errors. Import bank transactions into QuickBooks Online is a process that converts bank statements into QuickBooks-compatible files for bookkeeping and reconciliation. This best-practices guide compares methods, tools, and common errors for importing bank transactions into QuickBooks Online and evaluates Rocket Statements against manual CSV and bank-feed workflows. Our platform converts PDF and image statements into spreadsheets, stores documents in cloud folders, syncs live transactions, and exports CSV, Excel, JSON, or QuickBooks-ready files via our QuickBooks Online integration. Which approach saves you hours and reduces reconciliation surprises?
Which method should you use to import bank transactions into QuickBooks Online?
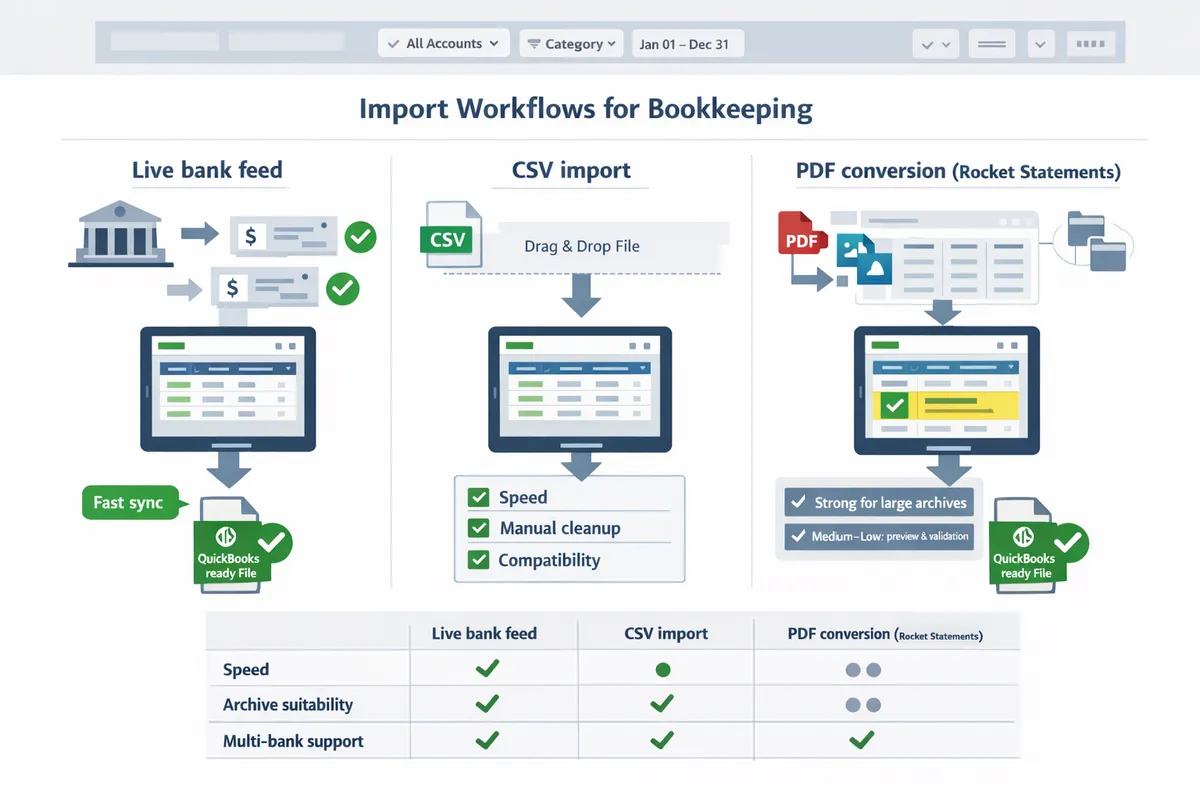
Choose the method that matches your transaction volume, bank coverage, and tolerance for manual cleanup. Small, single-bank clients often work best with manual file imports; firms with many clients, multi-bank estates, or large PDF archives typically prefer a converter or direct feeds to reduce repetitive work. This section compares live bank feeds, CSV/OFX/QBO imports, and Rocket Statements so you can pick the right path for your client load and historical needs.
What is a direct bank feed? 🔌
A direct bank feed is a live connection that pulls transactions from a bank into QuickBooks Online. A direct bank feed is a connection that pushes new transactions into QuickBooks automatically, reducing recurring manual uploads. Typical setup takes 10–45 minutes per bank when the bank is supported; the main advantages are automatic updates and fewer mapping steps, while the main drawbacks are regional limitations and outages that pause imports. Common banks that support feeds include major national banks and many regional banks; verify coverage in QuickBooks by going to Banking > Add account and searching the bank name.
Pros:
- Automatic daily transaction pulls.
- Minimal per-import cleanup for standard bank formats.
Cons:
- Outages or credential expirations suspend feeds and require admin action.
- Some smaller or international banks do not offer compatible feeds.
How Rocket Statements helps: If a bank lacks feed support or you need to import historical PDF statements, our platform converts statements to QuickBooks-compatible files and can sync live transactions into QuickBooks via our QuickBooks Online integration.
⚠️ Warning: Direct feeds can stop if the bank changes credentials or connection protocols. Monitor the Banking page weekly and re-authenticate accounts promptly.
What is a manual file import (CSV, OFX, QBO)? 📁
A manual file import is exporting a bank file and mapping its columns to QuickBooks before upload. Manual file import is a process that maps exported bank files (CSV, OFX, QBO) to QuickBooks fields and then uploads them, which gives full control but requires careful formatting. QuickBooks accepts CSV, QBO, OFX, and QFX for different workflows; required fields typically include Date, Amount, Payee, Memo, and Check Number when present. Common pitfalls: inconsistent date formats (MM/DD/YYYY vs YYYY-MM-DD), thousands separators, negative vs. credit conventions, and stray header rows.
When to use manual import:
- The client’s bank does not support feeds.
- You need a strict audit trail for a short historical back-fill.
- Volume is low (for example, under a few hundred transactions per month for a single client).
How to reduce errors: standardize exports to YYYY-MM-DD dates, a single decimal separator, and remove extra header/footer rows before upload. For a full spec and template mappings, see our QuickBooks Bank Transaction Import 2026 guide.
💡 Tip: Save a master CSV template with exact QuickBooks column headers and a one-row example. Reuse that template across clients to cut formatting errors.
How Rocket Statements helps: Our converter produces QuickBooks-ready QBO/CSV exports and applies consistent mappings so you avoid the repetitive cleanup that costs accountants hours per client. See our guide on converting PDFs to QuickBooks-ready files for step-by-step mapping advice.
How does Rocket Statements compare to feeds and manual import? 🚀
Rocket Statements is a conversion and document-management platform that turns PDFs and images into QuickBooks-compatible files and stores originals in the cloud. Rocket Statements is a platform that converts PDF and image statements into spreadsheets, manages documents in cloud folders, and exports QuickBooks-compatible CSV, Excel, JSON, and QBO files while offering validation previews and mapping controls. Compared with a live feed, Rocket Statements adds a validation step that reduces mapping errors versus raw CSV exports. Compared with pure manual import, Rocket Statements reduces repetitive cleanup for bulk PDF archives and adds cloud document management so you retain originals next to exports.
Practical example: converting batches of scanned statements often costs an accountant several hours of manual reformatting; using automated conversion plus validation cuts that per-client cleanup time and lowers reconciliation rework. According to our QuickBooks Online integration page, Rocket Statements supports secure file exports and encrypted sync to QuickBooks for a smoother handoff.
Security and compliance: Rocket Statements offers end-to-end encryption and bank-level security controls for document storage and export. For step-by-step instructions on mapping outputs for QuickBooks Online, see our QuickBooks Online integration guide and the article on converting bank PDFs to spreadsheets.
Direct feed vs manual import vs Rocket Statements — comparison table
The table below compares setup time, ongoing maintenance, historical back-fill capability, accuracy risk, and best-use case for direct feeds, manual imports, and Rocket Statements.
| Method | Setup time | Ongoing maintenance | Historical back-fill | Accuracy risk | Recommended for (volume & bank count) |
|---|---|---|---|---|---|
| Direct bank feed | Low (10–45 min per bank) | Low (monitor auth) | Limited by bank (short windows) | Low for supported banks, medium during outages | Small to large firms with many daily transactions and banks that provide feeds; best when supporting 1–10 supported banks per client |
| Manual file import (CSV/OFX/QBO) | Low to medium (template prep) | Medium (per-upload mapping) | Good for short back-fills; manual for large archives | High if formats vary; common date/decimal issues | Small practices or single-client cases with <300 tx/month or strict audit trail needs |
| Rocket Statements (PDF conversion + exports) | Medium (initial mapping and folder setup) | Low (automated exports and cloud storage) | Strong for large historical archives and multi-bank PDFs | Medium–Low due to document preview and validation step | Firms processing multi-client PDF archives, many non-feed banks, or >1,000 historical transactions across several banks |
For step-by-step examples of converting PDFs into QuickBooks-ready files, see our beginner's guide on converting PDF bank statements to QuickBooks and the article on how Rocket Statements exports QuickBooks-compatible files.
How do you import bank transactions into QuickBooks Online step by step?
Follow a test-first workflow for each import method to prevent duplicates, mapping errors, and reconciliation problems. Start with a small sample import, confirm balances and mapping, then proceed with bulk imports or live syncs.
Direct bank feed setup and verification 🏦
Connect your bank in QuickBooks and immediately verify balances and recent transaction counts. 1) Sign in to QuickBooks Online, go to Banking, and choose Add account; follow the bank login flow. 2) After connection, confirm the latest balance in QuickBooks matches the bank portal for the most recent business day. 3) Reconcile the first 7 to 30 days of transactions to validate duplicate-matching and account mappings. 4) Turn on alerts for connection failures and schedule weekly balance checks.
- Check for multi-bank accounts and overlapping feeds that create duplicate entries. If you manage clients with many banks, Rocket Statements can sync live transactions and reduce manual feed setup; see our QuickBooks Online integration for details.
- If QuickBooks reports missing historical data, confirm your bank supports back-dating and note QuickBooks' limits on how far back automatic feeds will pull.
CSV / OFX / QBO import workflow 🗂️
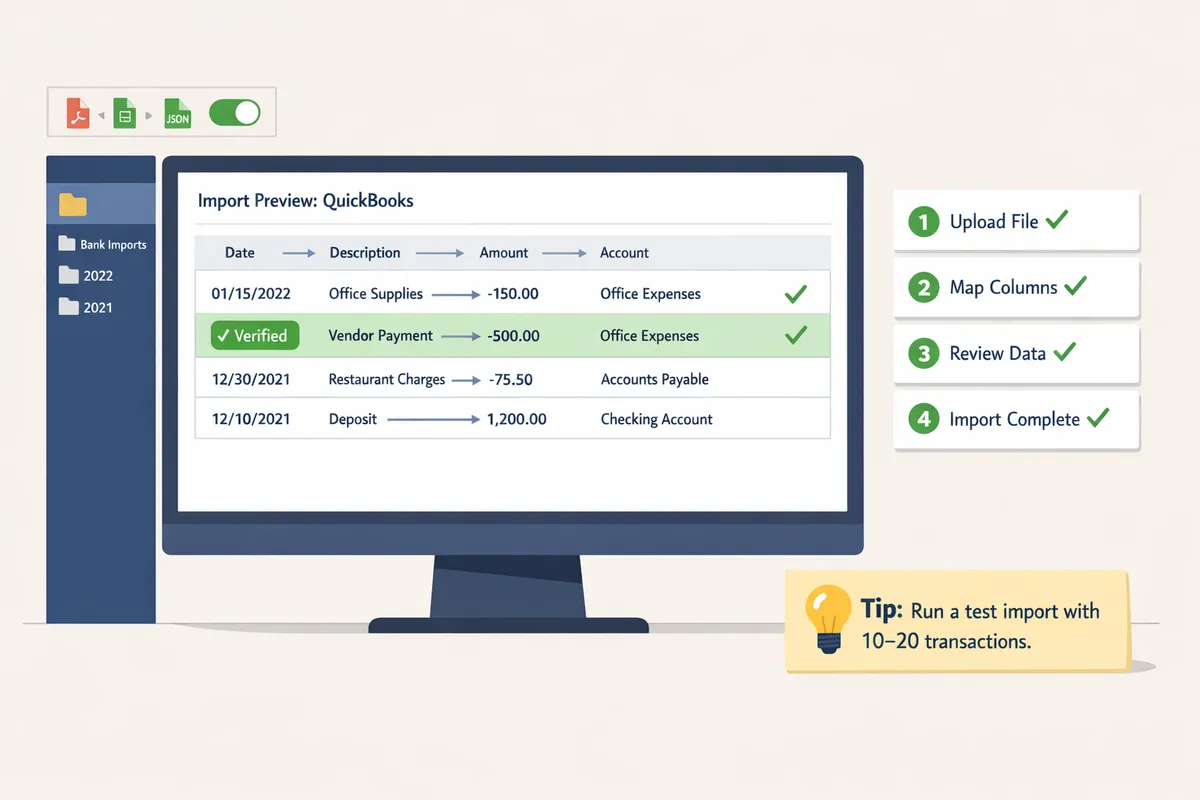
Export a representative sample file and perform a test import on a copy of the company file before bulk upload. 1) Export 10–20 transactions from the bank in CSV, OFX, or QBO. 2) Open the file and run the field-mapping checklist below. 3) Import to a sandbox or a copy of the company file and confirm how QuickBooks matches payees and duplicates. 4) Only proceed with bulk import after successful validation.
Checklist before import:
- Field mapping: Date, Description, Amount, Transaction Type, Check Number, Memo.
- Date formats: use YYYY-MM-DD or the format QuickBooks expects for your company.
- Currency: include a currency column for multi-currency companies.
- Rounding: ensure amounts use two decimals consistently.
If QuickBooks requires .qbo and you only have OFX, test an ofx to qbo converter free on a tiny sample first to confirm formatting. For a managed approach that outputs QuickBooks-ready QBO and CSV files, see our FAQ on whether Rocket Statements can export QuickBooks-compatible files.
PDF to QuickBooks workflow using Rocket Statements 📄
Upload PDFs to Rocket Statements, review the mapping preview, and export QuickBooks-ready files or sync live. 1) Upload bank statement PDFs into Rocket Statements. 2) Verify OCR extraction on each statement and correct any misread amounts or dates. 3) Use Rocket Statements' mapping UI to correct payee and memo fields, and preview the final output. 4) Export as CSV or QBO for QuickBooks import, or enable the QuickBooks sync to push transactions directly (authenticate the QuickBooks connection first).
- Use the mapping preview to fix merged lines, split deposits, and unusual memos before export. That prevents hours of manual cleanup later.
- For step-by-step setup and common PDF issues, read our guide on PDF bank statements to QuickBooks in minutes | Rocket Statements and our QuickBooks Online Integration.
How to import only 2026 transactions into QuickBooks Online ✅
Filter the export or conversion job to the 2026 date range before converting or importing to avoid importing unwanted history. Option 1: In your bank portal, set the export date range to 2026 only, then export CSV/OFX and import. Option 2: In Rocket Statements, set extraction filters so the converter outputs only lines dated in 2026 and export the QuickBooks-compatible file.
Steps for each option:
- Bank portal: select 01/01/2026 to 12/31/2026, export, test-import 10–20 rows, then bulk import.
- Rocket Statements: upload PDFs, apply the 2026 date filter, preview extraction, export QBO/CSV and import to QuickBooks.
- Confirm QuickBooks back-dating limits and reconciliation impact before importing large historical ranges. If you have multi-bank accounts with overlapping date ranges, reconcile each bank separately to avoid mismatched opening balances.
CSV template and field-mapping cheat sheet 🧾
Use a standardized CSV template with exact headers and validation rules to reduce rework and import rejections. Below is a recommended header row and one example line you can copy into a spreadsheet.
| Date | Description | Amount | Type | CheckNo | Memo | Currency |
|---|---|---|---|---|---|---|
| 2026-03-15 | ACME Supplies | -123.45 | Expense | Office supplies purchase | USD |
Mapping table (QuickBooks field, required format, validation rule):
| QuickBooks Field | Required Format | Validation Rule |
|---|---|---|
| Date | YYYY-MM-DD | Dates within company fiscal year or intended import range |
| Description (Payee) | Text, 1–255 chars | Match vendor/customer names to QuickBooks list where possible |
| Amount | Number with two decimals (negative for expenses) | No thousands separators; use period for decimal |
| Type | Deposit or Expense | Must be one of Deposit or Expense for CSV imports |
| CheckNo | Numeric or blank | Optional; used to match check payments |
| Memo | Text | Keep short, use for split details if needed |
| Currency | 3-letter ISO (USD, CAD) | Required for multi-currency companies |
Pre-import validation routine:
- Run a 10–20 row test import to confirm field mapping and duplicate matching.
- Compare counts and totals between source file and QuickBooks after the test.
- Spot-check amounts and payee matches for top 10 largest transactions.
- Correct any mapping issues, then re-run the test.
💡 Tip: Quick pre-import test: Always run a test import with 10–20 transactions to confirm mappings and duplicate-matching behavior before importing hundreds or thousands of lines.
How do you validate imports and measure success after importing bank transactions?
Validate imports by running reconciliation checks, transaction counts, and data-quality audits immediately after every import. This prevents duplicates, mismatched accounts, and missing transactions from cascading into month-end reconciliations. The steps below give a repeatable checklist, error-fix rules, security controls, and simple KPIs you can report to clients or auditors.
Reconciliation checklist ✅
Use a short, numbered reconciliation checklist that compares opening and closing balances, transaction counts, and totals between the bank statement and QuickBooks for the import period. Follow this numbered workflow for each import period:
- Verify beginning balance. Confirm QuickBooks opening balance equals the statement opening balance or document the reason for any variance (timing, uncleared items). Example: a $12.34 opening mismatch often means a decimal or date-parsing error from the import.
- Confirm transaction count and sum. Match the number of statement lines to the number of imported transactions and compare the summed credit and debit totals.
- Check for missing dates and out-of-range transactions. Sort by date and flag any entries outside the expected period.
- Reconcile bank fees and interest. Ensure fees posted on the statement appear as separate transactions or adjustments in QuickBooks.
- Mark reconciliation complete and save the audit packet. Save the original statement PDF, the exported import file, and a short reconciliation notes file in the client folder.
Rocket Statements can produce QuickBooks-ready files and store source PDFs in cloud folders to shorten step 1 through 4; see our guide on converting PDFs to QuickBooks-ready files for samples and templates (PDF Bank Statements to QuickBooks in Minutes).
Fixing duplicates, splits, and mismatched accounts 🔁
Resolve duplicates by matching each statement line to a single QuickBooks entry and using duplicate-protection tools when available. Use this decision rule set when you find an issue:
- Exact duplicate rows (same date, amount, reference). Delete the imported row if the original QuickBooks entry is correct and the import row adds no additional source documentation. Prefer deletion over editing the original entry.
- Partial duplicates (same amount/date but different memo or category). Merge transactions only if you can preserve the original audit trail. Otherwise, create a correcting entry and leave originals intact.
- Splits and fees. If a merchant charge and fee appear as one line on the statement, split the imported transaction into payment and fee lines in QuickBooks rather than deleting either part.
Incorrect fixes cost the firm in lost audit trails and misstated P&L. For example, deleting an imported customer payment instead of voiding it can understate revenue and trigger an audit question. Rocket Statements provides mapping previews and duplicate-protection flags that reduce manual merging and deletion—review the QuickBooks export preview before importing. For mapping edge cases and recommended file layouts, see our export FAQ (Can Rocket Statements export QuickBooks-compatible files?).
Security and compliance checks 🔒
Verify encryption in transit and at rest, limit user access, and retain an audit log for every import and export. According to Rocket Statements' QuickBooks Online Integration page, the platform uses end-to-end encryption and regular security audits. Use the following checklist for secure credential handling and document retention:
- Use secure credential vaults or QuickBooks bank connection methods instead of sending credentials by email. Rotate access tokens when personnel changes occur.
- Limit QuickBooks roles to the minimum required (reconciliation role versus admin role) and review access monthly.
- Retain original statement PDFs, the exported files, and a one-line reconciliation note for audit purposes. Store these artifacts in a dated cloud folder with restricted access.
- Log each export/import action with user name, timestamp, and filename. Keep logs for the firm’s required retention period.
⚠️ Warning: Never share raw bank credentials over email or chat; use secure vaults or QuickBooks' bank connection methods to reduce exposure.
For implementation steps and bank-connection options, review our QuickBooks integration guide and the bank statement converter documentation.
How to measure success and report ROI 📊
Measure success with a small set of quantitative KPIs that track time saved and error reduction. Recommended KPIs for small accounting firms:
- Time per import (minutes). Measure from file receipt to cleared reconciliation.
- Post-import error rate (corrections per 1,000 transactions). Track duplicates, date fixes, and mapping corrections.
- Days to full reconcile for backfills. Time from first import to cleared reconciled balance.
Example ROI calculation: if a client import historically takes 4.0 hours and automation reduces manual work to 0.5 hours, multiply hours saved by your billing rate to estimate monthly savings. Track these KPIs for three months to show trend lines before presenting to clients.
Rocket Statements reduces manual hours for firms handling large PDF backfills by automating extraction, mapping previews, and QuickBooks export, which lowers manual copying, fixes, and reconciliation rework. Use the metrics above to quantify those savings and link to our bank statement conversion guide for templates and sample calculations (Convert Bank Statements Into QuickBooks‑Ready Files and QuickBooks Bank Transaction Import 2026: CSV/QBO/QFX Specs).
Frequently Asked Questions
This FAQ answers the most common operational and security questions accountants ask when they import bank transactions into QuickBooks Online. Read the short, actionable answers and follow the linked how-to guides for step-by-step workflows.
How accurate is OCR for bank statements? 🤔
OCR accuracy varies with scan quality and statement layout, with low-resolution scans and multi-column PDFs producing the most errors. Sample and validate: export 20 lines from the OCR output and confirm payees, dates, and amounts before importing. According to Rocket Statements, its extractor flags low-confidence lines and places them in a review queue so you can correct payees or amounts in a spreadsheet before conversion to QBO or CSV. Common failure modes include split rows, embedded headers inside pages, and scanned check images treated as text.
💡 Tip: Always check a random 20-line sample from each batch and fix mismatches before bulk import.
Can I import OFX files directly into QuickBooks Online?
QuickBooks Online will not reliably accept raw OFX files; you should convert OFX to QBO or CSV before importing. Test with a single converted file, confirm date and credit/debit signs, then run a small import to validate field mapping. Rocket Statements can convert OFX into QuickBooks-compatible formats and will preserve memo fields when possible. If the bank portal offers a QBO export, prefer that native format; otherwise convert and validate.
Is there an ofx to qbo converter free?
Free ofx to qbo converter tools exist, but they often alter formatting or drop memo and reference fields, so validate every conversion. Try a free converter on a single file and import that into a test company file to confirm QuickBooks accepts the file and matches fields. For repeat conversions, consider paid tools or Rocket Statements' conversion service for more consistent, audited output and easier mapping controls. See our guide on Can Rocket Statements export QuickBooks-compatible files? for mapping tips.
How do I import only 2026 transactions into QuickBooks Online?
Filter the source data to the 2026 date range before you convert or import, and test the filtered file on a copy of the company file. Follow these steps:
- Export or filter transactions in the bank portal to the 2026 date range, or set the date range when extracting with Rocket Statements.
- Convert the filtered export to QBO or QuickBooks-ready CSV using Rocket Statements or your chosen converter.
- Import the filtered file into a sandbox company file and confirm beginning/ending balances and transaction counts.
- After validation, import into the live company and run reconciliation for January 2026.
For a walkthrough that includes scanned PDFs and multi-bank exports, see PDF Bank Statements to QuickBooks in Minutes | Rocket Statements.
Will importing bank transactions create duplicates?
Imports can create duplicates when QuickBooks already has matching entries or when mapping creates near-duplicates, so always run duplicate checks before reconciling. Use QuickBooks' match rules to catch bank-feed matches and rely on Rocket Statements' duplicate protection during conversion to mark likely repeats. Practical steps: run a transaction count and bank balance check prior to import, import a 50-line sample, then run QuickBooks' Find Duplicate tool and fix mapping rules if necessary.
How secure is storing statements in the cloud?
Cloud document security depends on encryption in transit and at rest, strict access controls, and independent audits or certifications. According to Rocket Statements' QuickBooks Online integration page, the platform offers end-to-end encryption, role-based access, and third-party compliance checks. Mitigations you should adopt: use MFA, limit folder access by role, keep a local encrypted backup of raw statements, and require audit logs for bulk downloads.
⚠️ Warning: Do not store unencrypted raw statements on shared drives; that increases breach and compliance risk.
Choose the approach that reduces manual cleanup and prevents import errors.
Automating the conversion step frees small accounting teams from hours of spreadsheet fixes and mapping retries. Rocket Statements is a platform that helps users save time and money by automating the process of converting statements into spreadsheets and managing documents in the cloud. The product has the following features:
- Convert PDF and image statements into spreadsheets
- Manage documents in cloud folders and subfolders
- Sync live transactions from bank accounts
- Convert statements into CSV, Excel, JSON, and PDF files
- Convert statements into QuickBooks-compatible files
Schedule a consultation to review a sample upload and map your QuickBooks fields with an expert via the QuickBooks Online integration page. Try a short pilot so you can compare manual imports, CSV fixes, and Rocket Statements’ automated output side by side. See our guide on PDF Bank Statements to QuickBooks in Minutes | Rocket Statements for a step-by-step pilot and the Convert Bank Statements Into QuickBooks‑Ready Files article for common mapping checks.
💡 Tip: Start with one month of statements and one account to validate mapping before a full migration.