How to Input Bank Statements into Google Sheets (Step‑by‑Step CSV Import with Free De‑Dupe and Running‑Balance Logic)

How to Input Bank Statements into Google Sheets (Step‑by‑Step CSV Import with Free De‑Dupe and Running‑Balance Logic)
An accounting team can waste eight hours a month reconciling messy bank statement exports. How to input bank statements into Google Sheets is a step-by-step process that covers CSV import, free de-duplication methods, running-balance formulas, and when to use automated tools for live sync. This how-to guide gives practical CSV import steps, free dedupe tricks, and the exact running-balance formula accountants use to reconcile quickly. Rocket Statements converts PDF and image statements into spreadsheets, manages documents in cloud folders, syncs live transactions, and exports CSV, Excel, JSON, PDF, and QuickBooks-compatible files. Learn how our Google Sheets integration reduces manual cleanup and when a live bank data sync saves time. Which CSV import method keeps balances accurate without extra scripting?
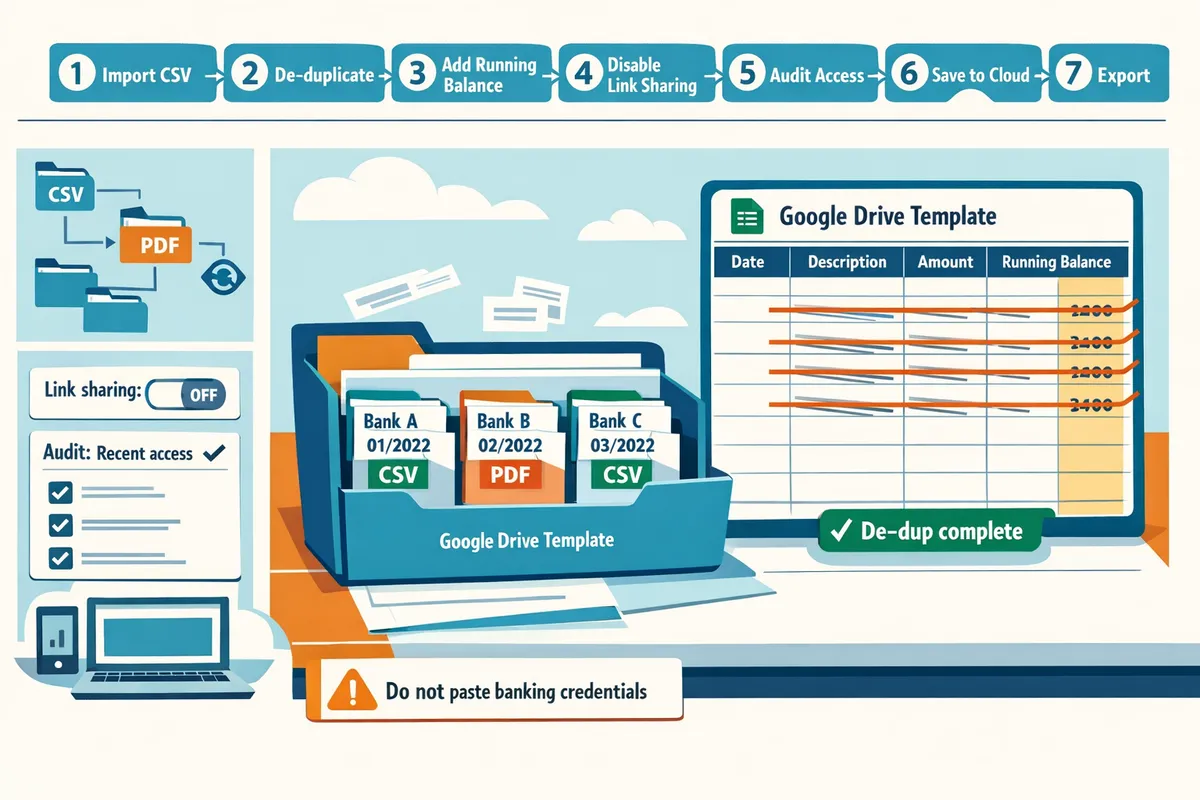
Prepare file formats, access rights, and security settings before importing bank statements into Google Sheets.
Prepare your CSV exports, any PDFs that need conversion, and a locked-down Google Sheet template before you import to avoid mapping errors and data exposure. CSV is the preferred format because it maps cleanly to columns; use PDF exports only when CSV is unavailable or statements are scanned. According to Rocket Statements' Google Sheets integration page, automated conversions support bank-level encryption and end-to-end protections for imports.
Step 1: Gather your bank statement files (CSV exports and PDFs) into one folder. 🗂️
Gather all CSV downloads and PDFs into a single local or cloud folder so you can standardize and batch-process them. Export CSVs from major online banking portals by opening the account, choosing Transactions or Statements, selecting the date range, and using Export or Download > CSV. Name each file so you can match it to accounts at a glance, for example: BankName_AccountLast4_2025-12.csv. Use PDF exports when the bank does not offer CSV, when the statement layout is irregular, or when you have scanned images.
PDFs require a conversion step before import; Rocket Statements can convert PDFs and images into CSVs and spreadsheets, which saves hours compared with manual rekeying. If you plan to ingest many historical PDFs, consider the automated approach described in Automatically Import Bank Statements into Google Sheets from Multiple Banks (Live Sync + PDF Backfill, No Duplicates).
Step 2: Choose or create a bank statements to sheets template with Date, Description, Amount, and Reference columns. 📋
Use a reusable template that contains at minimum these columns: Date, Description, Amount, Debit/Credit flag (or signed Amount), Reference or Transaction ID, and Account identifier. Example column set: Date | Account | Description | Amount | Currency | Balance | Reference. Store the template in Google Drive under a Templates/Bank Imports folder and make a copy for each account or month. Add an Account column when you consolidate multiple bank feeds into one sheet.
Rocket Statements provides export options that match these common templates, which reduces mapping work during import. For a ready-made starter, see Convert Bank Statements to Google Sheets (2026): 5 Methods Compared + Free Template.
Step 3: Standardize dates, currency formats, and column headers before you import. 🔧
Standardize date formats, decimal/thousand separators, and column headers so the CSV import maps fields correctly and running-balance formulas work without manual fixes. Check dates for ambiguity (MM/DD/YYYY versus DD/MM/YYYY) and convert them using your spreadsheet or a quick Find & Replace prior to import. Verify CSV delimiters: open the file in a text editor to confirm comma versus semicolon separators, or import into Google Sheets with the correct delimiter setting.
Normalize currency by using a separate Currency column or replacing symbols with ISO codes (USD, GBP, EUR). Consistent headers cut mapping errors during CSV import and reduce time spent reclassifying rows after import. If many PDFs require normalization, Rocket Statements can output CSVs that match your template headers to skip most of this cleanup. See How to Upload PDF Bank Statements to Google Sheets in Minutes for conversion tips and common header mappings.
Step 4: Secure sharing and permissions on the Google Sheet and limit edit access. 🔒
Restrict edit rights, maintain a read-only archive copy, and apply Google Workspace sharing controls before you place bank data in Sheets. Set the import destination to a folder with limited access, make the working spreadsheet editable only by the accounting team, and give reporting or ops staff Viewer access. Use Protected ranges for formulas such as running balances and lock those cells to editors only.
Keep a separate read-only archive of raw CSVs and original PDFs in Drive. For stronger document controls and encrypted storage, consider storing originals in Rocket Statements' cloud document management and linking the processed CSVs to your sheet. Disable link-sharing and audit recent access if new users are added.
⚠️ Warning: Do not paste live banking credentials or store full account logins in Sheets. Keep credentials in a password manager and use audited integrations instead.
Import CSVs into Google Sheets and apply free de-duplication and running-balance logic with step-by-step instructions.
Follow these seven practical steps to import monthly CSVs, run a free de-duplication pass, add a running-balance column, and validate totals before closing the month. This workflow works for single-account imports and for teams that later want to automate with scheduled CSV exports or Rocket Statements' PDF conversion and live sync.
Step 1: Open the template, copy it, and name the sheet by account and month 🔖
Open a new Google Sheet from our bank statements template, make a copy, and name that copy with account and month (for example: Checking - 2026-03). Copying the template preserves import-ready headers, the audit tab, and the helper columns used for de-duplication and balance math. Use a folder structure like Year/Account (2026/Checking) so appending monthly CSVs stays predictable when you run bulk imports. Expected outcome: a working spreadsheet with standard headers (Date, Description, Reference, Amount, Balance, Audit) and a clear filename so appended rows never go into the wrong month.
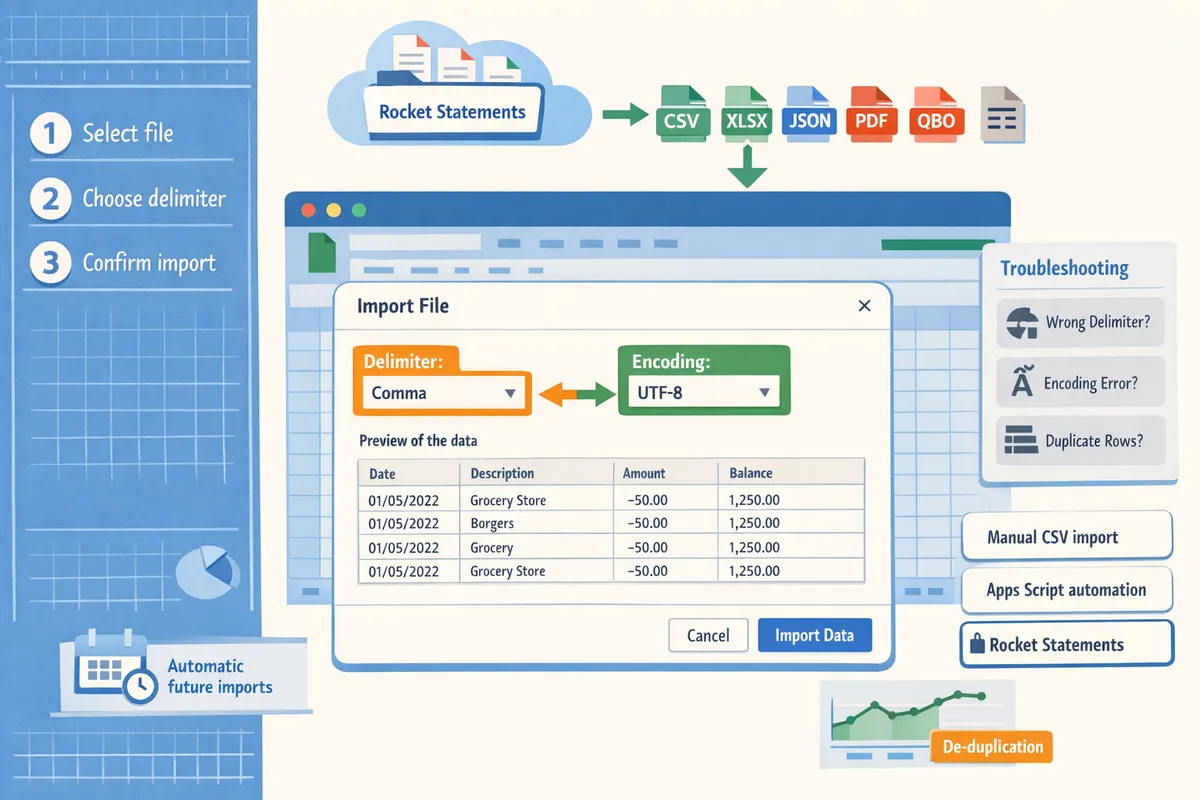
Step 2: Import the CSV using File > Import and choose Append or Replace based on whether you're adding a new month or reloading data 📥
Choose Append to current sheet when you add a month's CSV to existing rows; choose Replace current sheet when you need a clean reload. Before importing, confirm the CSV encoding (UTF-8 is safest) and delimiter (comma or semicolon depending on your bank). Use the preview shown in Google Sheets to check for column shifting. If dates appear in the wrong column or a description wraps into two cells, cancel and recheck the delimiter or open the CSV in a text editor to confirm layout. Quick step sequence:
- File > Import > Upload CSV.
- Set encoding to UTF-8 and delimiter to Comma (or test Semicolon).
- Choose Append to current sheet or Replace current sheet.
- Review the preview rows, then import. Expected outcome: rows added in the correct columns with no shifted cells.
Step 3: Map and normalize columns so you have Date, Description, and one signed Amount column 🧭
Normalize columns so the sheet has a single Date column, a Description column, and one signed Amount column before you run de-duplication or balance math. If the bank export gives separate Debit and Credit columns, convert them to one Amount column where credits are positive and debits are negative. For example, insert an Amount column and populate it by taking the credit value when present and the negative of the debit value when a debit appears. Standardize the Date format to YYYY-MM-DD using Format > Number > Custom date so sorting and matching behave predictably. Expected outcome: every transaction row has a single numeric Amount, a normalized Date, and a concise Description ready for matching.
Step 4: Remove duplicate transactions using Date + Amount + Reference and always run the dedupe on a copy first 🧹
Use Date + Amount + Reference (or Date + Amount + Description when Reference is missing) as your primary dedupe key and run the removal on a copy of the sheet first. Practical dedupe keys to try, in order of reliability:
- Date + Amount + Transaction ID or Reference.
- Date + Amount + Description (when Reference is unavailable).
- Date (same day) + Amount + first 10 characters of Description (for frequent vendor duplicates). Safe step sequence:
- Make a copy of the imported sheet or duplicate the tab.
- Add a helper column that flags rows where Date, Amount, and Reference match an earlier row (use the Data > Remove duplicates tool or a counting-based helper to flag matches).
- Filter flagged rows, manually review a sample of 10-20 flagged duplicates, then remove them. Expected outcome: duplicate rows removed without losing legitimate split transactions.
💡 Tip: Always keep an audit tab with the original CSV filename and import timestamp so you can restore or re-run dedupe on the raw data.
Step 5: Add running-balance logic so each row shows the account balance after the transaction ➗
Add a running-balance column that starts from a clearly stated opening balance and adds each signed Amount so the Balance column reflects the ledger after each transaction. Implementation notes: set a single Opening Balance cell at the top (for example, cell B2) and make the first transaction row compute Opening Balance plus that row's Amount. For each subsequent row, set the balance to the previous row's balance plus the current row's Amount. Always sort the sheet by Date (and an import timestamp for same-date transactions) before calculating balances to avoid errors. If you import out-of-order transactions later, re-sort and refresh the running-balance column. Handling examples: if the opening balance is 2,500.00 and the first transaction is a -200.00 debit, the first balance row becomes 2,300.00. If multiple transactions share a date, sort by the bank's posted time or import sequence to match the statement ordering.
Step 6: Reconcile totals and validate opening and closing balances against the original statement ✅
Reconcile by comparing your sheet's opening balance, net activity, and closing balance to the amounts on the original statement and flag discrepancies before finalizing the month. Validation checklist:
- Confirm Opening Balance in the sheet equals the statement opening balance.
- Compare Closing Balance (Opening + sum of Amount) to the statement closing balance; the difference should be zero.
- Sum credits and debits separately and compare to statement subtotals.
- Flag any rows with empty Reference numbers or blank dates for manual review. Keep an Audit tab that records the source CSV filename, import timestamp, and the person who ran the import. That audit trail speeds troubleshooting if a reconciliation mismatch appears during month-end. Expected outcome: a reconciled sheet where discrepancies are either explained (timing, bank hold) or investigated and corrected.
Step 7: Automate future imports by scheduling CSV exports or using Rocket Statements for PDF conversion and live sync 🔁
Automate imports either by scheduling bank CSV exports to flow into your process or by using Rocket Statements to convert PDFs and push live transactions into Google Sheets. Two practical automation paths:
- Scheduled CSV exports. Instruct the bank to produce monthly CSVs and place them in a shared folder. Use an automation tool or scheduled process to append those CSVs to the template and run the same normalize → dedupe → balance steps. This keeps control in your workspace but requires configuration and monitoring.
- Rocket Statements conversion and live sync. Rocket Statements converts PDF and image statements into structured CSVs and can sync live transaction feeds into Google Sheets, removing manual PDF rekeying and automating backfills. See our Google Sheets Integration for security and setup notes and try the guided trial to test PDF backfill and live syncing. For a full automated multi-bank setup and deduplication workflow, read our guide on Automatically Import Bank Statements into Google Sheets from Multiple Banks (Live Sync + PDF Backfill, No Duplicates). If you want a comparison of conversion methods and a free template to start, see Convert Bank Statements to Google Sheets (2026): 5 Methods Compared + Free Template and our step-by-step upload instructions in How to Upload PDF Bank Statements to Google Sheets in Minutes. Expected outcome: future months import automatically with fewer manual checks and faster reconciliation.
Fix common import errors, choose the right method for your team, and secure data after import.
This section shows how to troubleshoot the most common CSV import failures, pick between manual CSV import, Apps Script automation, or Rocket Statements, and apply reconciliation and security checks after import. Follow the decision criteria and checklists to reduce wasted hours, avoid reconciliation drift, and limit exposure of sensitive bank data.
Pick the right method for your team using a decision tree 🤔
Choose manual CSV import for low volumes and infrequent audits, Apps Script when you have a consistent format and dedicated maintainer, and Rocket Statements when you need multi-bank sync, PDF conversion, or stricter security. Use these four criteria to decide: transactions per month, bookkeeping headcount, tolerance for manual fixes, and compliance requirements. For example, a single-owner ecommerce shop with 200 monthly transactions and one bookkeeper usually saves time with manual CSVs plus our de-duplication steps. A mid-market firm with 2,000 monthly transactions and monthly client audits typically benefits from Rocket Statements' live sync and PDF backfill because it reduces reconciliation drift and manual rework. Choosing the wrong option costs hours each month, creates stale balances during month-end, and raises privacy risk when staff share spreadsheets to compensate for missing automation.
Compare manual CSV import, Apps Script automation, and Rocket Statements at a glance 📊
The table below compares setup time, ongoing maintenance, data accuracy, security posture, monthly cost, and estimated time saved for low, medium, and high transaction volumes.
| Option | Setup time | Ongoing maintenance | Data accuracy (typical) | Security posture | Monthly cost | Time saved by volume (low / medium / high) |
|---|---|---|---|---|---|---|
| Manual CSV import | Low (30–90 minutes) | Low to none; manual mapping each cycle | Medium; human error possible | Depends on Sheet sharing | $0 | 0–4 hours / 4–12 hours / 12+ hours |
| Apps Script automation | Medium (2–6 hours to build) | Medium; script fixes and format drift | Medium-high when formats stable | Medium; credentials live in Workspace | $0–$50 one-time dev cost | 2–8 hours / 8–20 hours / 20–40 hours |
| Rocket Statements | Low (guided setup) | Low; automated conversions and sync | High; PDF extraction + dedupe | High; bank-level protections and cloud folders | Paid subscription | 4–12 hours / 12–40 hours / 40+ hours |
See our guide on how to automatically import from multiple banks for a step-by-step Rocket Statements live-sync setup and deduplication strategy.
Quick fixes for the most common import errors 🛠️
Most import failures come from delimiter mismatches, encoding differences, or inconsistent date formats. Re-import using the correct delimiter (comma vs semicolon) if columns shift. Use Google Sheets' Data > Split text to columns when only a few rows shifted. Fix date parsing by standardizing formats: run DATEVALUE on sample cells and adjust locale parsing under File > Settings if necessary. If rows are missing, compare the original CSV row count to the sheet (use COUNTA) to spot truncation. Flag suspect rows with a validation column (formula returns TRUE for blank required fields) and review them manually. Expected outcome: after these steps you should match the source CSV row count and have dates parsed into real date values.
Data hygiene and reconciliation checklist ✅
A short, repeatable checklist prevents drift and speeds month-end reconciliations. Keep a raw CSV folder and never edit raw files. Create an immutable "raw_imports" tab that holds the untouched import. Run de-duplication each import: sort by date then amount and remove exact duplicates; for live feeds run dedupe daily. Maintain a mapping sheet that standardizes bank-specific column names to your ledger fields. Do a monthly reconciliation that checks opening balance, total debits, total credits, and ending balance against the statement PDF. Keep a one-line audit note per month with who reviewed reconciliation and the timestamp. Expected outcome: fewer manual edits, faster closure of month-end, and an audit trail for disputes.
Security checklist and when to consider Rocket Statements' cloud storage 🔒
Apply least-privilege sharing, enable MFA for all Google accounts with access, and review access quarterly. Store only the data you need in Sheets; retain full PDFs or originals in a secure cloud folder instead of embedding them inside spreadsheets. Encrypt sensitive exports before downloading to local drives. Consider Rocket Statements when you routinely handle multiple bank PDFs, need automated PDF-to-sheet conversion, or must meet stricter audit and retention requirements because our platform offers cloud folders, automated conversion, and bank-level protections that reduce the need to circulate raw documents in Sheets. ⚠️ Warning: Avoid granting editor access broadly; remove editors who no longer need access immediately and log changes to access lists.
Related reading: see our comparison of conversion methods in Convert Bank Statements to Google Sheets (2026) and the step-by-step live sync setup in Automatically Import Bank Statements into Google Sheets from Multiple Banks (Live Sync + PDF Backfill, No Duplicates).
Frequently Asked Questions
This FAQ answers the most common questions finance teams ask about importing bank statements into Google Sheets, covering conversion accuracy, deduplication, running balances, automation thresholds, and security. Each answer gives a practical next step you can apply to your CSV workflows or when evaluating Rocket Statements.
How accurate is OCR for bank statements? 🔍
OCR accuracy depends on scan quality, consistent layouts, and whether the statement is machine-generated or a scanned image. For example, a clean, machine-exported PDF often converts with very few errors, while a photographed or folded scan may require manual correction on 10–30% of rows. Our platform, Rocket Statements, flags low-confidence fields after conversion so you can spot-check only the suspicious rows instead of re-reviewing the entire file.
Can I import PDF bank statements directly into Google Sheets? 📄
You cannot reliably import PDFs directly into Google Sheets without first converting them to a spreadsheet format. The practical two-step approach is convert the PDF to CSV or XLSX, then use File > Import in Google Sheets to bring the structured rows into a staging sheet. Our platform, Rocket Statements, both converts PDFs and images into CSV/Excel and can push converted files directly into Sheets; see our guide on how to upload PDF bank statements to Google Sheets in minutes for a step-by-step flow.
How do I prevent duplicate transactions when importing monthly statements? 🔁
Prevent duplicates by importing into a staging sheet and deduplicating on a composite key such as date + amount + transaction ID before merging with your ledger. Use Google Sheets' Remove duplicates or create a helper column that concatenates the key and run UNIQUE or FILTER to isolate unique rows. 💡 Tip: Always import to a staging sheet first, run your dedupe pass, and confirm totals there; this avoids accidental deletions in your live ledger. For teams syncing multiple banks, our post on automatically importing statements into Google Sheets explains how Rocket Statements backfills PDFs and prevents duplicate rows across feeds.
How do I calculate a running balance in Google Sheets? ➕
A running balance is a cumulative total that starts from an opening balance and updates each row as you add transactions in chronological order. To implement it, anchor an opening balance cell, ensure transactions are sorted oldest to newest, and create a balance column that references the prior row's balance plus or minus the current row's amount so each row shows the live balance after the transaction. If you receive chronological exports from Rocket Statements, import order will preserve sequence and reduce errors when you build the running-balance column.
When should I move from manual CSV imports to an automated service like Rocket Statements? ⚙️
Move to automation when manual imports consume more time than the cost of a connector, when you handle multiple banks or frequent format variations, or when you need secure cloud retention of originals. As a rule of thumb, teams that spend several hours each month consolidating PDFs, or that manage statements from 3+ banks, usually find a short paid trial pays back in time saved. Try a brief trial to measure your current hours spent on imports, then compare that to the time Rocket Statements saves by converting PDFs, syncing live transactions, and storing documents in organized folders.
What security steps should I take if I store bank data in Google Sheets? 🔒
Limit sharing, enforce multi-factor authentication, audit access logs, and keep an encrypted archive of original statements outside the sheet. Specifically, restrict Sheet permissions to named accounts only, avoid link-sharing, use Google Workspace audit logs to review access, and store raw PDFs in an encrypted document store rather than embedding them into Sheets. Our Google Sheets integration documentation describes how Rocket Statements stores originals with bank-level encryption and provides controlled exports to Sheets so you can separate the working spreadsheet from the secure archive. ⚠️ Warning: Do not leave full account numbers or access credentials in a shared spreadsheet.
Automate imports and reduce manual cleanup by trying Rocket Statements.
Following the step-by-step CSV import, free de-duplication, and running-balance formulas, you should now have a repeatable process for how to input bank statements into Google Sheets that cuts manual rekeying and improves reconciliation accuracy. Use the sample month to confirm your de-duplication rules and running-balance formulas before scaling to multiple accounts. For teams ready to move from manual imports to live sync, see our guide on Automatically Import Bank Statements into Google Sheets from Multiple Banks for multi-bank backfill and scheduled updates.
Rocket Statements is a platform that helps users save time and money by automating the process of converting their statements into spreadsheets as well as manage their documents in the cloud. Start a free trial on our Google Sheets integration page to create your first connection and test live sync with a single account. For comparisons and templates, consult Convert Bank Statements to Google Sheets (2026): 5 Methods Compared + Free Template as you expand your Bank Data Import workflow.
Subscribe to our newsletter for implementation tips and monthly updates.