
How to Convert OFX to QBO for QuickBooks Online
How to Convert OFX to QBO for QuickBooks Online
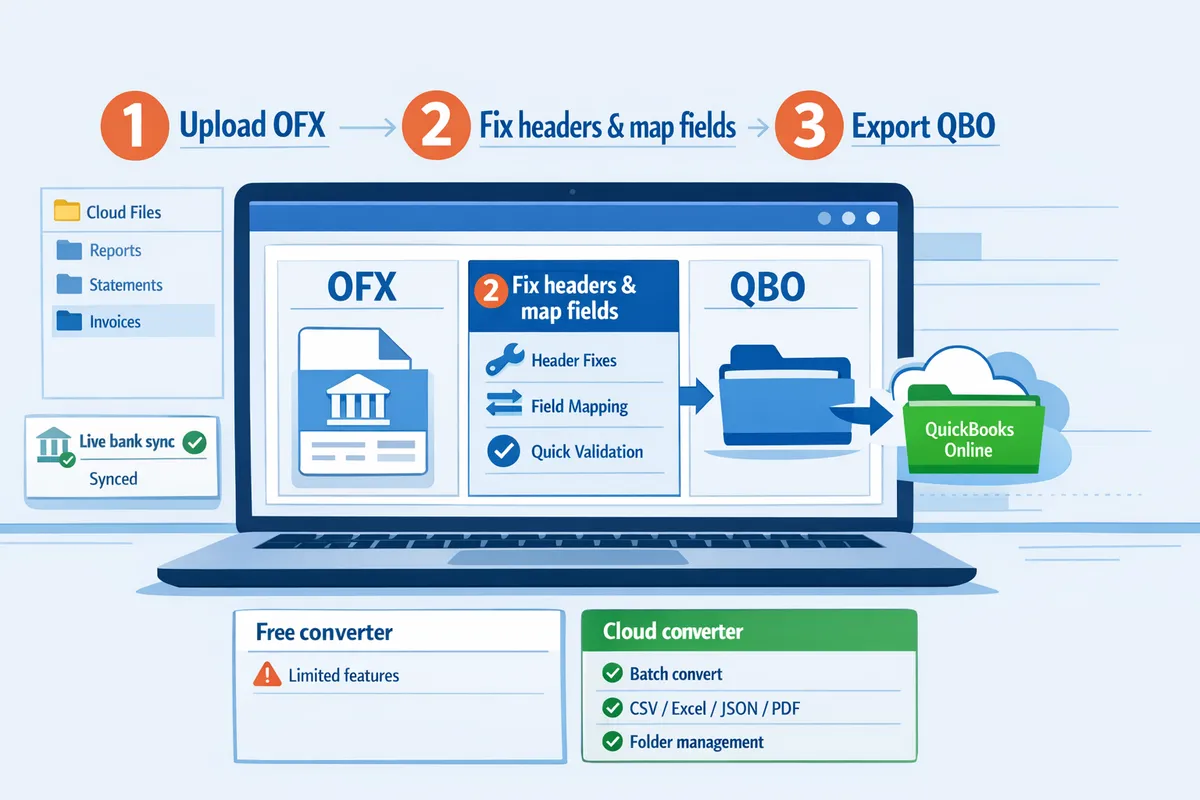
A failed OFX import can cost a small accounting firm several hours in manual fixes and lost billable time. How to convert OFX to QBO is a step-by-step process that converts OFX bank exports into QuickBooks Online-compatible QBO files for direct import. This how-to guide shows small-business bookkeepers and accountants how to convert OFX files, compare DIY converters with Rocket Statements, and complete imports with minimal errors. Our platform Rocket Statements automates conversions from PDF and image statements into spreadsheets, organizes documents in cloud folders and subfolders, syncs live bank transactions, and exports QuickBooks-ready QBO, CSV, Excel, JSON, and PDF files. See our QuickBooks Online integration for secure, automated bank statement processing. Which common OFX quirks cause the most import failures?
What should you check before converting an OFX file to QBO?
Check file type, Web Connect header blocks (including INTU.BID), character encoding, date format, and currency markers before converting an OFX file to QBO. These checks catch the most common QuickBooks Online import failures and save hours of manual fixes. Use these steps to validate the file before running a conversion or using Rocket Statements to automate the fixes.
How does OFX differ from QBO and QFX? 🧾
OFX is an open financial exchange file that stores raw transaction data, while QBO is a QuickBooks Web Connect file formatted specifically for QuickBooks import and QFX is Quicken's Web Connect format. OFX is a vendor-neutral data container that may omit QuickBooks-specific header lines, which is why banks sometimes supply OFX when QuickBooks requires QBO. For example, a bank OFX export will include transaction blocks but might lack the INTU.BID header QuickBooks expects for Web Connect. When you need a direct QuickBooks Online import, convert OFX to QBO so the file includes the QuickBooks header structure. Our Rocket Statements platform produces QuickBooks-compatible QBO exports and can save the manual step of inserting headers; see our guide on QuickBooks Bank Transaction Import 2026: CSV/QBO/QFX Specs, Desktop EOL Playbook, and No‑Code Automations with Rocket Statements for format differences.
How to inspect OFX headers and the INTU.BID requirement 🔍
QuickBooks rejects Web Connect files missing the required header block and a compatible INTU.BID, so open the file and confirm header lines appear before the <OFX> tag. Look for header lines such as OFXHEADER, DATA, VERSION, ENCODING (or CHARSET), and any INTU.BID or bank identifier entry. Common INTU.BID errors are: the INTU.BID line is absent, the value is blank, or the bank ID does not match the account's expected Web Connect ID. Simple fixes: add a KEY:VALUE header block (for example, INTU.BID:12345) using a plain-text editor, or run the file through Rocket Statements to insert correct Web Connect headers automatically. Steps to inspect and fix:
- Open the .ofx file in Notepad or a code editor and read the top 10 lines. Expect KEY:VALUE lines before <OFX>.
- Confirm ENCODING or CHARSET is present and not empty.
- If INTU.BID is missing or wrong, obtain the bank's Web Connect ID (bank support or online documentation) and add it as INTU.BID:xxxxx.
⚠️ Warning: QuickBooks will reject Web Connect files that lack a valid INTU.BID, resulting in an "unsupported file" error during import.
For header block rules and common error codes, see our QuickBooks Desktop import troubleshooting article QuickBooks Desktop 2026: How to Import Bank and Credit Card Transactions via .QBO/.QFX/.OFX (Web Connect Setup, Date Ranges, and Error Fixes).
Which date, encoding, and currency issues block imports? 📅
QuickBooks Online requires consistent text encoding (UTF-8 or Windows-1252), dates in QuickBooks-acceptable formats (YYYYMMDD or YYYYMMDDHHMMSS), and a matching currency code (for example <CURDEF>USD) to parse imports correctly. Signs of encoding problems include replacement characters (�), strange punctuation, or corrupted accents. Common date problems include human-readable formats (12/31/2025) or locale formats (31/12/2025) that QuickBooks cannot parse from OFX. Currency issues show up when amounts use comma decimals (1.234,56) while QuickBooks expects a period decimal (1,234.56) or when <CURDEF> is missing from the OFX transaction header.
Quick checks and quick fixes:
- Inspect the file header for ENCODING or CHARSET and resave as UTF-8 or Windows-1252 in a text editor.
- Search sample transaction lines for the date token format; convert slashes to compact YYYYMMDD if present.
- Verify decimal separators and the presence of <CURDEF>USD (or relevant ISO code). Change commas to periods for decimal separators if needed.
If you prefer an automated route, Rocket Statements will normalize encoding, dates, and currency markers during conversion so the resulting QBO file matches QuickBooks Online parsing rules. For mapping examples and when to clean files manually versus using a converter, see our comparison guide QuickBooks & Xero Bank Statement Automation in 2026: Import Mapping, Error Fixes, and When to Use Free vs Pro Converters and our FAQ on Can Rocket Statements export QuickBooks-compatible files? CSV for QBO and Spreadsheet Sync mappings explained (2026).
How to convert OFX to QBO: step-by-step conversion methods
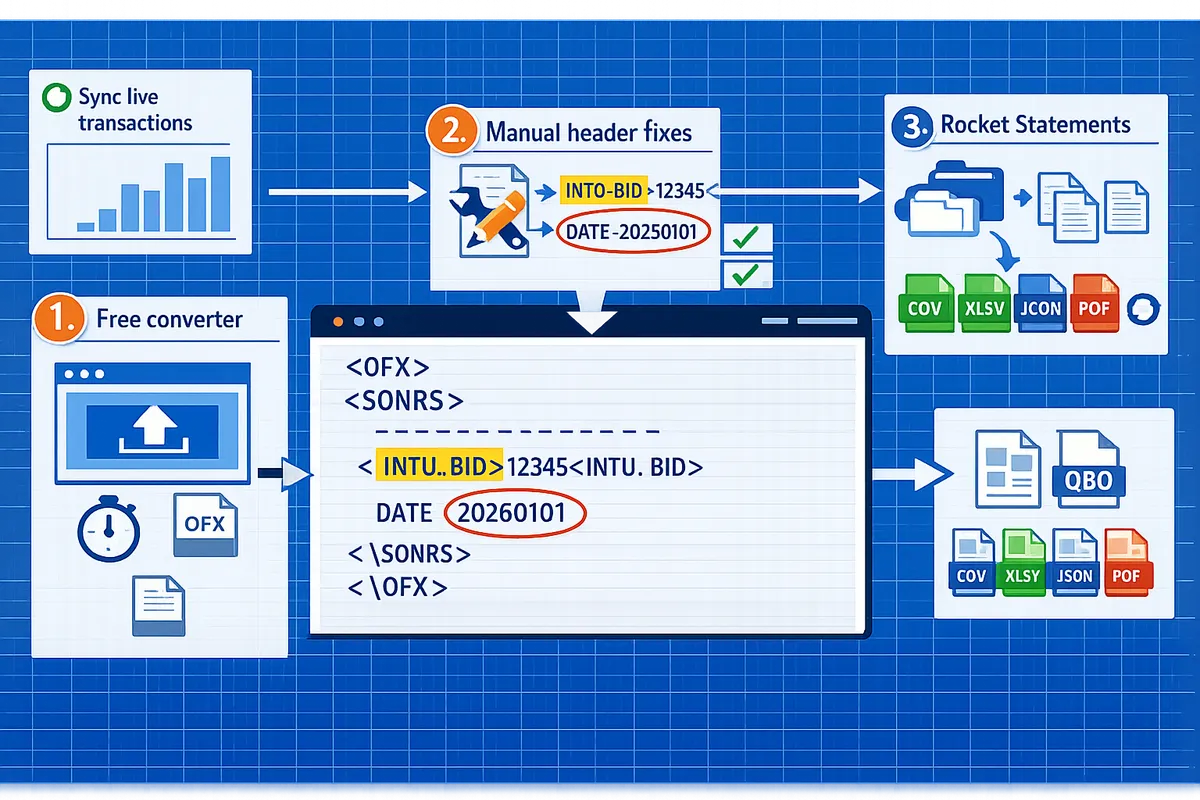
Pick the route that matches the file quality and the time you can spend: a free converter for a fast test, manual header fixes for one-off imports, or Rocket Statements for automated, repeatable output. Each option includes a short validation checklist so you know the QBO QuickBooks Online accepts before you import.
Step 1: Use a free OFX to QBO converter (quick test) 🔍
A free OFX to QBO converter is the fastest way to get a test QBO and see immediate import errors. Run the converter and then validate a 10–25 transaction sample instead of importing the whole month. Check these four items immediately: file extension is .qbo, the header block exists, dates match your company format (MM/DD/YYYY), and negative amounts show a minus sign not parentheses. Typical post-conversion edits include adding the Web Connect header lines, changing file encoding to UTF-8 or Windows-1252, and correcting date formats. If you see repeated rejections for INTU.BID or missing account IDs, stop and follow Step 2 or consider Rocket Statements for a cleaner output. For when to use free tools versus paid workflows, see our comparison in QuickBooks & Xero Bank Statement Automation in 2026: Import Mapping, Error Fixes, and When to Use Free vs Pro Converters.
Step 2: Manually fix headers, INTU.BID, and account GUIDs 🛠️
Adding a proper Web Connect header and a valid account identifier usually resolves import rejections. At the top of the file, ensure the Web Connect header block contains these lines :
- OFXHEADER:100
- DATA:OFXSGML
- VERSION:102
- SECURITY:NONE
- ENCODING:USASCII
- CHARSET:1252
- COMPRESSION:NONE
- OLDFILEUID:NONE
- NEWFILEUID:NONE
Then verify the bank/account block includes a bank identifier and account ID. QuickBooks expects a unique account identifier in the ACCTID field; using the actual bank account number or a unique alphanumeric string works for single-client imports. Add an <INTU.BID> entry inside the bank block if QuickBooks flags the file; community troubleshooting threads often show adding that one line clears the initial rejection. Manual edits save time for one-off imports but cost hours when repeated across clients. If you need Desktop-specific header differences or Web Connect tips, consult QuickBooks Desktop 2026: How to Import Bank and Credit Card Transactions via .QBO/.QFX/.OFX.
Step 3: Use Rocket Statements for automated conversion and mapping ☁️
Rocket Statements automates header fixes, encoding corrections, and account mapping so you avoid repeated manual fixes across clients. Upload your OFX, PDF, or image statements and Rocket Statements extracts transactions, corrects Web Connect headers, and produces QuickBooks-compatible QBO files or mapped CSV/Excel exports. The platform also stores files in cloud folders and can sync live transactions to QuickBooks Online, which reduces repeated cleanup. Typical workflow: upload file → review automated mapping in the dashboard → export .qbo or push via the QuickBooks Online integration. For details on export mappings and which fields still need a manual pass, read Can Rocket Statements export QuickBooks-compatible files? CSV for QBO and Spreadsheet Sync mappings explained (2026).
💡 Tip: Use Rocket Statements' QuickBooks Online integration in a sandbox company first to confirm mapping rules before pushing to a live client.
Step 4: Validate the QBO file before import ✅
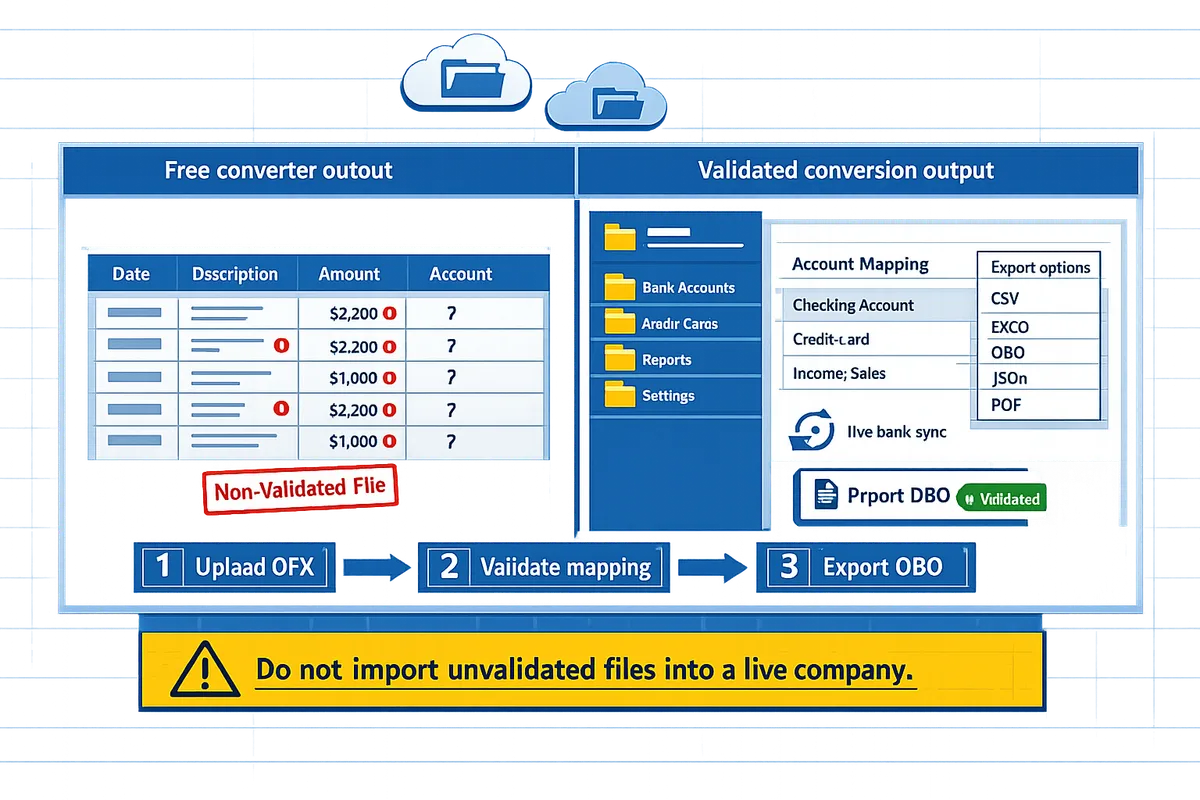
Validating a QBO file with a small sample prevents large rework after a failed import. Import 10–25 transactions into a QuickBooks Online sandbox company and check: account mapping, transaction dates and ranges, amounts (debits vs credits), and duplicate protection flags. If the import fails, look for these common blockers: missing or malformed INTU.BID, ACCTID mismatch with the target QuickBooks account, incorrect date format, or file extension not .qbo. Use our QuickBooks Bank Transaction Import 2026: CSV/QBO/QFX Specs, Desktop EOL Playbook, and No‑Code Automations with Rocket Statements for required field specs and pre-import checks. If problems persist, either apply the manual fixes from Step 2 or re-run the file through Rocket Statements to produce a validated QBO.
⚠️ Warning: Do not import unvalidated files into a live company; failed imports often create duplicate transactions that take longer to clean up than fixing the source file.
How to import the QBO into QuickBooks Online and handle common errors
Import the QBO through QuickBooks Online's Banking > Upload transactions flow and apply targeted fixes for header, encoding, and mapping errors. Web Connect is the QuickBooks import method that accepts QBO/QFX files and requires a correct header block and a matched QuickBooks bank account. Follow the UI steps, fix the specific error messages listed below, then confirm balances and category mapping so reconciliation stays accurate.
Step 1: Import the QBO file into QuickBooks Online 📁
Upload the QBO via Banking > Upload transactions or via the gear menu > Import data > Bank data, then choose the matching QuickBooks account before you start the import. Expect a three-step UI: pick file, map to an existing or new bank account, and review the import preview where QuickBooks shows matched, unmatched, and duplicate transactions. If QuickBooks prompts that the file is not a Web Connect file, confirm the extension is .qbo and that the header contains the Web Connect block (INTU.BID).
- Open Banking (left menu) then select Upload transactions.
- Choose the QBO file and set the bank account QuickBooks should attach transactions to.
- Review the preview screen and click Let’s Go to import.
Expected outcome: QuickBooks shows transactions under Reviewed or For Review and updates the ledger if you accept matches. If the import fails immediately, move to the targeted troubleshooting steps below.
Step 2: Troubleshoot common QuickBooks import errors 🛠️
Match specific QuickBooks error messages to a single corrective action so you fix imports fast. The most common errors and fixes are listed below.
- "This is not a supported file format" → Re-save the file with a .qbo extension and confirm the file begins with a Web Connect header block (INTU.BID).
- "Bank account not found" → In the import step, pick the exact QuickBooks bank account or create a new Web Connect account that matches the bank name on the statement.
- "Parsing error" or "Unable to read file" → Re-encode the file to UTF-8 without BOM or run the file through Rocket Statements to produce a QuickBooks-compatible QBO.
- "This file contains transactions for multiple accounts" → Split the QBO into per-account files; QuickBooks imports one account per QBO.
- "No new transactions to import" → Check the transaction dates and prior imports for duplicates; QuickBooks ignores duplicates by transaction ID or exact matches.
Troubleshooting checklist: confirm .qbo extension, inspect for INTU.BID header block, verify encoding (UTF-8), ensure one account per file, and confirm date ranges.
⚠️ Warning: Editing the wrong lines in the header can corrupt the file. If you cannot safely add INTU.BID, upload the file to Rocket Statements for automated header and encoding fixes.
Helpful reference: our QuickBooks Bank Transaction Import 2026: CSV/QBO/QFX Specs, Desktop EOL Playbook, and No‑Code Automations with Rocket Statements explains header block requirements and encoding details.
Step 3: Reconcile and map transactions after import ✅
Confirm opening balances, match imported totals to your source statement, and correct category mapping to avoid reconciliation drift. Start by comparing the opening balance QuickBooks shows for the account with the opening balance on the bank statement. Then run these steps:
- In Accounting > Chart of Accounts, open the bank account and check the opening balance.
- Use Banking > For Review to accept matched transactions and use Find Match when QuickBooks suggests potential duplicates.
- Run a quick totals check: filter imported transactions by statement date range and compare the sum to the original statement total.
- Spot-check 10–15 transactions for payee, memo, and category correctness; adjust rules for recurring items.
Expected outcome: Account register balance reconciles against the bank statement within a single-cent tolerance. If totals differ, look for duplicate imports, missing starting balance, or currency/date format mismatches.
💡 Tip: If you regularly import bank statements, set up category rules in QuickBooks and use Rocket Statements to produce consistent QBO files so the rules apply reliably.
Related reading: Our guide on Can Rocket Statements export QuickBooks-compatible files? CSV for QBO and Spreadsheet Sync mappings explained (2026) shows mapping checks and which fields still need a manual pass.
Step 4: DIY converters vs Rocket Statements vs paid tools — comparison 🔍
Compare cost, time, error risk, and manual work to pick the right conversion route for your practice. The table below contrasts three common options.
| Option | Typical cost | Time per file | Error risk | Manual work required | Best for |
|---|---|---|---|---|---|
| Free OFX to QBO converter | Low or free | Minutes for a clean file; longer if header edits are needed | High if file has custom headers or encoding issues | Manual header fixes, encoding fixes, split files | One-off imports or tests |
| Rocket Statements | Subscription or pay-per-page (offers a trial) | Minutes; automated header, encoding, and mapping fixes | Low; automated checks reduce import failures | Minimal: verify mappings and run a quick totals check | Accounting teams and firms with recurring imports |
| Paid converter services | Per-file or per-account fee | Minutes to hours depending on support level | Medium; vendor-dependent quality control | Some vendor review plus client verification | High-volume, bespoke migration projects |
Decision checklist: estimate hours spent fixing a failed import, count how often files require header fixes, and weigh whether recurring imports justify a paid automation tool. For a head-to-head on when to use free vs pro converters and how Rocket Statements fits an automation stack, see QuickBooks & Xero Bank Statement Automation in 2026: Import Mapping, Error Fixes, and When to Use Free vs Pro Converters.
Frequently Asked Questions
This FAQ answers the practical questions bookkeepers ask about converting OFX to QBO, import limits, common errors, and when to use Rocket Statements. Use these quick, actionable answers to decide whether a DIY fix will save time or whether a tool will reduce rework and risk.
Can I import an OFX file directly into QuickBooks Online?
Yes. QuickBooks Online accepts Web Connect files in QBO format, not raw OFX in most cases. Raw OFX files often lack the Web Connect header block or use slightly different tags, which causes QuickBooks to reject the file. If your OFX already contains an INTU.BID and proper OFX/SONRS headers, QuickBooks may accept it; otherwise convert or patch the header first. See our guide on QuickBooks Bank Transaction Import 2026 for required header and date conventions.
Is there a reliable free OFX to QBO converter?
Sometimes. Free converters work for single, simple bank exports but often need manual header edits and do not handle batch jobs reliably. Expect to spend time fixing encoding, date formats, or mapping errors after a free conversion; that extra validation often erases the apparent time savings. Use free tools for a quick test import, and consult our comparison of free vs pro converters in QuickBooks & Xero Bank Statement Automation in 2026 when deciding whether to scale.
What causes an INTU.BID error and how do I fix it?
An INTU.BID error means QuickBooks could not find a recognized bank identifier in the QBO header. The fix is to open the file, locate the Web Connect header block, and add or correct the INTU.BID and BANKID lines to match the issuing bank. If you are unsure which bank code to use, compare a working QBO from the same bank or use Rocket Statements to generate a ready-to-import QBO because the platform auto-populates header blocks.
⚠️ Warning: Edit headers only in a copy of the file. A broken header can make QuickBooks reject the entire import.
Will conversion change transaction dates or amounts?
No. Properly executed conversion should not change transaction amounts or posted dates. Most mismatches come from date-format interpretation (MM/DD/YYYY vs DD/MM/YYYY), time-zone offsets, or character-encoding issues during conversion. Quick verification steps: open the source OFX in a text editor to confirm date formats, run a hash or quick totals on amounts pre- and post-conversion, and reconcile a 10-transaction sample in QuickBooks Online before full import.
When should I use Rocket Statements instead of a DIY converter?
Use Rocket Statements when you need consistent, repeatable results across many files or clients, because it automates header fixes, field mapping, and batch exports to QuickBooks-compatible files. Rocket Statements reduces manual rework for firms that process multiple statement types, store documents in cloud folders, or need CSV/QBO exports that follow QuickBooks import specs. If you want a side-by-side comparison of manual vs automated workflows and expected time savings, read QuickBooks Bank Transaction Import 2026 and our article on QuickBooks & Xero Bank Statement Automation in 2026 for decision criteria.
How do I preserve categories and memos during conversion?
Preserve categories and memos by mapping those fields explicitly during conversion or by using a tool that preserves payee and memo text fields. Manual converters sometimes drop memos or truncate payee names; confirm the converter maps the OFX/MEMO and PAYEE fields to QuickBooks' MEMO and PAYEE columns. Rocket Statements supports explicit field mappings and exports QuickBooks-compatible files while keeping memo and payee text intact; see Can Rocket Statements export QuickBooks-compatible files? for mapping details and the common fields that require a manual pass.
Final steps to convert OFX to QBO and finish the import.
If you followed the walkthrough, you now have a QBO-ready file and a short checklist to catch common format errors; this guide shows exactly how to convert OFX to QBO without needless rework. Run header and amount checks, confirm date formats, and keep a 10-transaction test batch to limit rollback time.
Validate the file against QuickBooks import rules before a full upload. See the CSV/QBO/QFX specs and no-code automations for import-ready formatting and mappings from our QuickBooks Bank Transaction Import 2026 guide.
💡 Tip: Import a small sample, reconcile one account, then import the rest to avoid month‑end surprises.
If you prefer an automated option for how to import OFX file into QuickBooks Online, try Rocket Statements. Rocket Statements is a platform that helps users save time and money by automating the process of converting statements into spreadsheets and managing documents in the cloud. It converts PDF and image statements to spreadsheets, stores files in folders and subfolders, syncs live bank transactions, and exports CSV, Excel, JSON, PDF and QuickBooks-compatible files. Learn more about how we export QuickBooks-compatible files in our FAQ.
Start a free trial of Rocket Statements to convert a sample OFX, export a QBO file, and complete the import into QuickBooks Online.