Bank Statements to Google Sheets (2026): Beginner’s Guide to Live Bank Sync, CSV Imports, Header Mapping, and Fixing Duplicates

Bank Statements to Google Sheets (2026): Beginner’s Guide to Live Bank Sync, CSV Imports, Header Mapping, and Fixing Duplicates
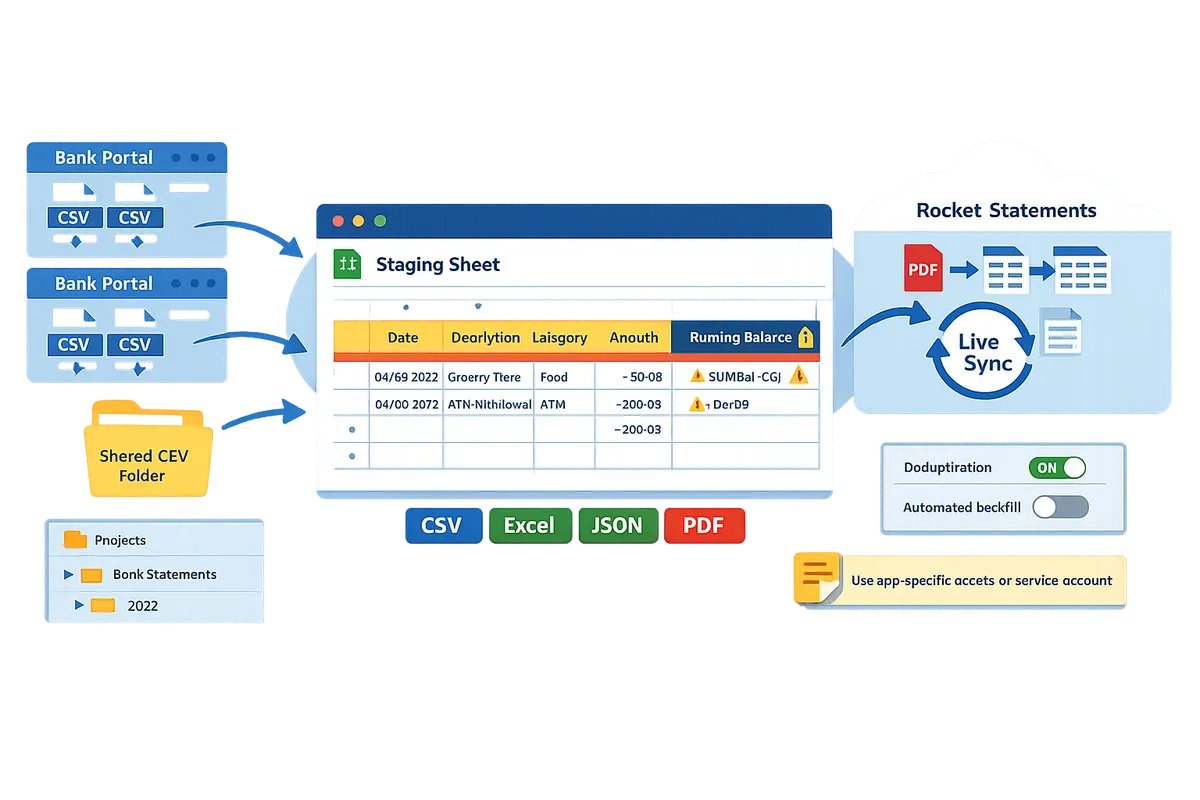
Small bookkeeping teams lose four hours weekly reconciling exported statements and fixing import errors. This beginner's guide explains bank statement to google sheets for importing, cleaning, and maintaining statement data for bookkeeping and reporting. Bank statement to Google Sheets is a workflow that converts PDF and image statements into structured spreadsheet rows for reporting and bookkeeping. If different bank layouts feel overwhelming, our guide starts from zero with practical examples. Our Rocket Statements automates PDF and image conversions with batch processing (see our bank statement converter), stores documents in cloud folders, syncs live transactions, and exports CSV, Excel, JSON, PDF, and QuickBooks-compatible files (see our Google Sheets integration). Later we show header-mapping steps and the dedupe fixes accountants use to stop duplicate imports.
What is the bank statement to Google Sheets workflow and which input formats matter?
The bank statement to Google Sheets workflow is a process that converts raw bank files into structured spreadsheet rows for bookkeeping, reconciliation, and reporting. Choosing the right input format—CSV, PDF/OCR, or live bank sync—directly reduces manual mapping, duplicate rows, and reconciliation errors. Rocket Statements automates conversion and storage so teams spend less time fixing imports and more time on analysis.
How do bank statement formats differ? 🧾
Bank statement formats differ by file type, column naming, and printed layout, and those differences determine how much manual mapping a file needs before it becomes useful in Sheets. A bank statement converter is a tool that extracts transactions and standardizes fields across varied layouts so each row becomes a consistent record. For example, some banks export CSVs with fixed headers like Date, Description, Amount while others only provide PDFs that print Debit and Credit in two columns, or use localized date formats like DD/MM/YYYY. Those variations create field-mapping work: you must map "Amount" to your spreadsheet's credit/debit columns or normalize dates for formula-driven running balances.
Rocket Statements detects bank-specific layouts and applies templates to reduce manual header mapping. For community tips on handling odd formats, see our forum discussion on organizing statement formats.
Why choose a CSV-first approach for Google Sheets? ✅
A CSV-first approach is the most reliable path for Google Sheets because CSVs map directly to rows and columns and avoid OCR mistakes that come with PDF or image extraction. CSV is a plain-text file format that stores table data as comma-separated values and opens natively in Sheets without layout guessing. For example, importing a clean CSV often reduces mapping time from hours to minutes for a 1,000+ transaction file because you can map headers once and reuse that mapping.
Rocket Statements can convert PDFs and images into CSVs so your team can follow a CSV-first workflow while retaining cloud storage and backfill capabilities. For a step-by-step CSV import and a free dedupe template, see our CSV import guide.
💡 Tip: Standardize dates to YYYY-MM-DD and normalize negative-amount conventions (negative vs separate debit/credit columns) before merging multiple CSVs.
How does live bank sync compare to CSV imports and PDF extraction? 🔁
Live bank sync provides a continuous feed of transactions, unlike CSV imports or PDF extraction which create point-in-time snapshots. Live bank sync is a connection that streams new transactions from an account into your system so Sheets receive updates without manual uploads. The main benefit is reduced manual refresh and consistent, near real-time reporting; the trade-offs are higher setup time, required permission management, and the need for robust duplicate protection.
Rocket Statements supports live sync plus PDF backfill so you can combine continuous feeds with historical statements. For multi-bank live sync configurations and dedupe strategies, see our guide on automatically importing bank statements into Google Sheets.
⚠️ Warning: Grant read-only access and enable duplicate protection when activating live sync. Revoke unused permissions immediately to reduce security risk.
| Method | What it is | Setup time | Ongoing cost | Error risk | Best for | Backfill | Deduplication complexity |
|---|---|---|---|---|---|---|---|
| CSV export | Bank-provided CSV files you upload to Sheets | Low (minutes) | Low | Low if CSV is consistent | Monthly reports, ad hoc imports | Manual (upload older CSVs) | Low (match on date+amount+description) |
| PDF/OCR extraction | AI or OCR converts PDF/image statements into rows | Medium (template tuning) | Medium | Medium to high (misread numbers, split rows) | Legacy banks that only provide PDFs | Batch backfill possible | Medium to high (OCR introduces fuzzy matches) |
| Live bank sync | Continuous transaction feed from accounts | High (permissions, bank linking) | Medium to high | Low if duplicate protection is enabled | Real-time dashboards, multi-account consolidation | Automatic (plus PDF backfill) | Low if dedupe rules run server-side by the tool |

For multi-account templates and running-balance logic that reduce month-end reconciliation time, see our multi-account template and dedupe guide. For details on connecting Rocket Statements to Google Sheets securely, see Rocket Statements Google Sheets integration.
How do I start importing bank statements to Google Sheets (step-by-step beginner recommendations)?
Start with a CSV-first workflow or enable Rocket Statements live sync so you get clean rows in Sheets quickly. CSV exports give you predictable columns that make mapping and deduplication fast. If some banks only offer PDFs, Rocket Statements converts those PDFs into CSV/Excel and can keep Sheets updated with live transactions.
Step-by-step CSV-first import (best for small firms) 📁
Exporting CSVs from each bank and consolidating them into one folder is the fastest low-risk path to a clean Google Sheet. Follow these steps:
- Export CSVs. From each online bank portal choose CSV or Excel for the date range you need (monthly or custom). Example: export Jan–Dec for year-end closing.
- Consolidate files. Put all CSVs in a single folder and give them a predictable name: BankName_Account_Last4_YYYY-MM.csv. That naming saves time when importing or scripting later.
- Create a staging Sheet. Open a new Google Sheet. Use File > Import and choose "Append to current sheet" or use IMPORTDATA for a live CSV link for one-off feeds.
- Standardize headers and dates. Keep a single header row (Date, Description, Amount, Balance, Account). Normalize dates to YYYY-MM-DD where possible to avoid locale parsing errors.
- Run a quick dedupe. Sort by Date + Description + Amount and remove exact duplicates before adding formulas or pivot tables.
If you must convert PDFs into CSV first, our website's bank statement converter can batch-process statements into spreadsheet files before step 1. For a full CSV import walkthrough, see our guide on how to input bank statements into Google Sheets.
Use Rocket Statements to convert PDFs and enable live sync ⚙️
Rocket Statements converts PDF and image statements into structured spreadsheets and can set up live transaction sync to Google Sheets. Set up looks like this:
- Create a Rocket Statements account and verify your company folder. Our website stores converted files in cloud folders so you keep originals for audit.
- Upload PDFs or connect accounts for live sync. Rocket Statements detects common bank formats and extracts line items into Date, Description, Amount, and Balance fields.
- Configure the Google Sheets integration. Choose the destination Sheet, pick the mapping template, and enable backfill to pull historical statements.
- Enable deduplication rules. Turn on the dedupe setting to compare incoming transactions against existing rows by date, amount, and reference.
For setup details and security notes, follow our Google Sheets integration documentation and the multi-bank live sync guide on our website.
Header mapping basics and a ready template 🧩
Header mapping is a process that matches bank-exported field names to your bookkeeping headers to prevent misaligned columns. A canonical bank statements to sheets template maps common bank headers to bookkeeping fields; example mappings:
- Transaction Date -> date (normalize to YYYY-MM-DD)
- Transaction Description or Payee -> description
- Debit/Credit or Amount -> amount (use negative numbers for withdrawals)
- Running Balance -> balance
- Account Number -> account_id
Apply the template at import time so each file lands in the same columns. For banks that label the same field differently (for example, "Post Date" vs "Trans Date") map both to Transaction Date in the template. Our website provides a free bank statements to sheets template and a multi-account template that includes dedupe and running-balance logic.
💡 Tip: Keep the raw CSV or original PDF in a dated archive folder before applying mappings so you can revert if a mapping rule misfires.
Permissions and Google Sheets setup 🔐
Grant the minimal integration permissions and store templates in a shared folder so access is auditable. Use a service account or app-specific account for the integration instead of personal credentials. This keeps ownership tied to your business and simplifies rotations.
Practical steps:
- Create a dedicated Google account or service account for imports and share only the destination Sheet with it.
- Store mapping templates and archived source files in a shared drive with restricted edit rights. Give editors edit access only to the staging tab, not the template tab.
- Enable version history and protect header rows and calculated columns to prevent accidental edits to formulas and running-balance logic.
⚠️ Warning: Don’t use personal login credentials for automated imports. Use app-specific access or a service account to reduce the risk of a credential lockout or accidental exposure.
For multi-bank setups and automated backfill with deduplication, see our detailed walkthrough on automatically importing bank statements into Google Sheets from multiple banks.
How do I prevent duplicates, validate data, and reconcile imported transactions?
Prevent duplicates and reconcile quickly by applying unique transaction keys, consistent date and amount formats, and automated validation rules as part of your import pipeline. These controls stop double-crediting, avoid aggregation errors, and save hours each month on manual cleanup. Implement checks at import time and keep a reconciliation sheet that flags unmatched rows for human review.
Duplicate-detection rules and step-by-step fixes 🔁
Use a combined unique key (date + rounded amount + truncated description or bank transaction ID) to detect duplicate rows reliably. Rocket Statements can include bank transaction IDs and produce consistent CSVs so your unique key works across live sync and PDF backfills. Examples: treat 2026-05-01|125.00|PAYROLL as the canonical key; if a row matches exactly, mark it duplicate.
Follow this checklist to identify and fix duplicates safely:
- Backup the raw import sheet before any edits.
- Create the combined key column for every feed (date normalized, amount rounded to cents, first 30 characters of description, plus account ID if present).
- Filter duplicate keys and tag with source (CSV, OCR, live sync).
- Review suspected duplicates manually for legitimate repeats (recurring payments, installments).
- Remove or archive true duplicates in a separate sheet; never permanently delete without a backup.
- If you accidentally remove a needed row, restore from the backup sheet and re-run dedupe.
Rocket Statements reduces manual tagging by adding consistent IDs and by offering built-in dedupe during live sync and PDF conversion. For a full automated setup that combines live feeds and backfilled PDFs, see our guide on automatically importing from multiple banks with no duplicates.
💡 Tip: Always copy the raw import tab to a "raw_archive" sheet before running dedupe logic so restores are trivial.
Date and amount normalization across banks 📅
Normalize dates to YYYY-MM-DD and standardize decimal separators before merging multiple bank feeds. This avoids sorting errors, incorrect month grouping, and pivot-table mismatches. Example: convert 31/12/2025 to 2025-12-31 and convert €1.234,56 to 1234.56 before any calculations.
Practical steps you can apply now:
- Set a canonical date format (YYYY-MM-DD) and convert each feed during import or in a preprocessing tab. Treat ambiguous formats (01/02/2025) by confirming the bank locale before conversion.
- Remove currency symbols and unify separators so every amount is a plain number with a decimal point. Store original currency in a separate column when you need multi-currency reporting.
- Use Rocket Statements export options to request consistent date and number formats when you convert PDFs or pull live transactions. That reduces manual normalization work when combining several banks.
If you merge data from European and US banks, run a quick sample of 20 rows from each provider to confirm the expected formats before a full import. For templated workflows, our multi-account template includes a normalization sheet that standardizes dates and amounts automatically.
Validation checks and reconciliation workflow ✅
Run validation rules for required fields, numeric checks, and a running-balance comparison to catch import errors before they contaminate reports. Rocket Statements can produce exports that include running balances and structured fields, which makes automated validation simpler.
A step-by-step reconciliation workflow:
- Import raw files into a "raw_imports" tab and keep the original file in cloud storage.
- Normalize dates and amounts in a preprocessing tab.
- Generate the combined unique key and mark duplicates.
- Validate required fields (date, amount, description, account ID) and flag missing data for correction.
- Compare the imported running balance against the bank statement closing balance and flag discrepancies greater than a chosen tolerance.
- Move unmatched or flagged rows to a "reconcile_queue" with columns for reason, suggested fix, and assigned reviewer.
- After manual resolution, append corrected rows to the master ledger and archive original imports.
Validation examples: reject rows with nonnumeric amounts, highlight transactions with negative amounts in both credit and debit columns, and flag date gaps in expected daily activity. Rocket Statements can reduce false positives by standardizing inputs before these checks.
⚠️ Warning: Avoid storing full card numbers or unredacted personal identifiers in Google Sheets. Keep sensitive files in encrypted cloud folders and use Rocket Statements document management to store originals securely.
Decision table: CSV import vs PDF/OCR vs live bank sync 🔍
Choose CSV for predictable monthly imports, PDF/OCR for historical backfill from paper statements, and live bank sync for continuous feeds and minimal manual reconciliation.
| Method | Typical setup time | Ongoing maintenance | Accuracy for line items | Best use case | Deduplication ease | Multi-bank scale |
|---|---|---|---|---|---|---|
| CSV export | 5–30 minutes per account | Low (schedule occasional checks) | High when banks provide CSV | Single-account monthly imports or ad-hoc uploads | Moderate. Use combined key for dedupe | Good for handful of accounts |
| PDF/OCR conversion | 30–90 minutes to configure templates | Medium (format changes require updates) | Medium. OCR errors require review | Backfilling years of paper or scanned statements | Moderate. Requires fuzzy matching rules | Practical for many accounts if using batch OCR tools |
| Live bank sync | 1–3 hours to authorize and map accounts | Low to medium (monitor connection changes) | High for current transactions | Ongoing bookkeeping for 5+ accounts and real-time reporting | High. Rocket Statements can dedupe during sync and backfill | Best for scale and continuous imports |
For many small teams, a hybrid approach works best: use live sync for current activity and PDF/OCR only to backfill history. See our step-by-step CSV import guide for de-dupe and running-balance logic and our post on automatic multi-bank imports for a live-sync plus PDF backfill setup using Rocket Statements.
What next steps and advanced resources help maintain live sync, reporting, and security?
Scale your bank statement to Google Sheets workflow by automating refreshes, building repeatable dashboards, and enforcing security controls. Live sync is a feature that keeps transaction rows current by pulling new bank activity automatically. Use automated imports, a consistent bank statements to sheets template, and document folders to reduce manual reconciliation, speed month-end, and simplify audits with Rocket Statements.
Automate refreshes, scheduled imports, and folder organization
Automate refreshes and scheduled imports to keep your Sheets current without manual uploads. Use Rocket Statements' live sync when you need continuous feeds; enable scheduled CSV exports for low-activity accounts or banks that do not support direct sync. Set a clear cloud-folder hierarchy (Year/Bank/Account/StatementType) and store original PDFs beside converted CSVs so an auditor can trace any row back to source in two clicks. Name files with YYYY-MM-DD_accountname_statement.pdf to make backfills and script-free restores predictable. Link each Sheet import to its source folder so you can re-run a historical backfill without remapping headers.
💡 Tip: Schedule daily imports for high-volume business accounts and weekly imports for payroll or savings accounts to balance freshness and API usage.
Read the multi-bank live sync setup in our guide to automatically import bank statements into Google Sheets for configuration steps and backfill patterns.
Building dashboards and report templates in Google Sheets 📊
Build dashboards with consistent headers and pivot tables that update when new rows arrive. A bank statements to sheets template is a spreadsheet template that standardizes headers and date formats across accounts so pivot tables and charts never break when new files arrive. Start by locking a single header row: Date, Account, Description, Category, Debit, Credit, Balance, ImportID. Create pivot tables for monthly cash flow, category spend, and reconciliation exceptions, and connect those pivots to charts on a dashboard sheet. Use one sheet for raw imports, one for normalized rows (where Rocket Statements places standardized columns), and one for dashboards. Example: pivot bank by Category and Month to produce a clean monthly spend table that populates a connected bar chart.
See the multi-account template and dedupe checklist for header examples and a ready-made dashboard layout.
Security, privacy, and compliance checklist
Apply encryption, minimal permissions, and audit logging to protect bank statement data in Google Sheets. Verify encryption at rest and in transit, restrict OAuth scopes to necessary access, and keep detailed audit logs for file access and conversion jobs. Store raw PDFs in a restricted cloud folder and only grant view or comment access to external auditors. Mask account numbers in working reports and keep a redacted copy for sharing. Rocket Statements' Google Sheets Integration page explains bank-level encryption and PCI-related controls we maintain and the permissions model used when syncing.
⚠️ Warning: Avoid adding full account numbers, social security numbers, or unmasked personally identifiable information into shared Sheets. Mask before sharing.
When to use Rocket Statements versus a DIY pipeline
Choose Rocket Statements when you manage multiple banks, varied statement formats, or need live sync and cloud document management to reduce maintenance. A DIY pipeline suits a single account with stable CSV exports and low monthly volume, but it increases time spent mapping headers, fixing format drift, and reworking dedupe logic as accounts multiply. Rocket Statements removes repeated mapping work by detecting bank formats, batch-processing PDFs into CSV/Excel/QuickBooks formats, and managing cloud folders so you spend time on analysis, not cleaning data. Try the Rocket Statements Google Sheets add-on to compare a manual CSV import workflow with a live sync setup and see how much setup and ongoing maintenance each path requires.
ROI calculator and time-saving examples
Estimate ROI by comparing hours spent on manual imports to hours after automation and multiplying by your hourly bookkeeping cost. For example, if manual imports and cleanup take 10 hours per month and automation reduces that to 1 hour: hours saved = 9; at $40/hour savings = $360/month or $4,320/year. For five mid-volume bank accounts, multiply the per-account time saved to calculate staffing impact or faster close cycles. Use these steps to run your own calc: 1) measure current monthly hours for imports and reconciliation, 2) estimate post-automation hours (include review time), 3) multiply saved hours by your billable rate, 4) add one-time setup cost and compare payback period.
For templates and presized examples to plug into this calculator, open the bank statements to sheets template and follow the step‑by‑step CSV import guide to get baseline numbers for your business.
Convert Bank Statements to Google Sheets (2026): 5 Methods Compared + Free Template
Frequently Asked Questions
This FAQ answers common beginner and multi-bank questions about importing bank statements into Google Sheets. Each entry gives a direct answer plus practical next steps you can apply today.
How accurate is OCR for bank statements? 🖨️
OCR is a text-recognition tool that reads characters from PDFs and images, and its accuracy depends on scan quality and statement layout. Good-quality PDFs with standard fonts and consistent column lines typically yield accurate extraction. Low-resolution scans, screenshots of mobile statements, or banks that use unusual font spacing increase character and column errors. Validate OCR output against a sample CSV before bulk processing and correct header mappings first. Rocket Statements detects bank formats automatically and flags low-confidence rows so you can review them in a staging sheet rather than importing bad data into your live books. For more on PDF extraction tools, see our Bank Statement Converter page.
How do I import bank statements to Google Sheets from multiple banks? 🔁
The safest approach is a CSV-first pipeline or enabling live sync per account while standardizing headers with a canonical template. Export each bank's CSV or enable Rocket Statements live sync for accounts you want continuously updated. Then map each bank's column names to your bookkeeping headers using a single "bank statements to sheets" template. Merge files only after mapping and deduplication in a staging sheet. Follow the multi-account setup in our Multi-Account Template guide to reduce manual column-matching and avoid reconciliation headaches. If you need scheduled backfills plus live feed control, read Automatically Import Bank Statements into Google Sheets from Multiple Banks.
What file format works best for Google Sheets imports? 📁
CSV is the most straightforward format because it maps directly to rows and columns and avoids OCR ambiguities. Use Excel only when you need multiple sheets, workbook-level metadata, or formulas that must travel with the file. For automated imports, CSV minimizes parsing rules and reduces header mismatches. Rocket Statements exports CSV, Excel, JSON, and QuickBooks-compatible formats so you can pick the format that fits your workflow; choose CSV for repeatable automated pipelines. See our comparison of conversion methods if you want to weigh OCR-first versus CSV-first approaches.
How do I fix duplicate transactions after import? 🔍
Identify duplicates using a unique transaction key such as date + amount + the first 20 characters of the description, then remove or mark duplicates in a staging sheet. Create a staging sheet that imports new rows, apply your unique-key formula to flag duplicates, and write rules to keep the earliest cleared row or the one with the most complete description. Maintain an audit column that records the source file name or sync timestamp for traceability. Rocket Statements includes deduplication checks during conversion and will mark suspected duplicate rows so you can review them before merging into your master ledger.
💡 Tip: Keep an immutable import audit column (source filename and timestamp) on every imported row to make rollbacks and audits simple.
For a stepwise CSV import and dedupe workflow, see How to Input Bank Statements into Google Sheets (Step‑by‑Step CSV Import with Free De‑Dupe and Running‑Balance Logic).
Is it safe to sync live bank data to Google Sheets? 🔐
Live bank sync can be safe when the integration enforces bank-level encryption, least-privilege access, and audit logging. Review the integration's permission scopes before granting access and restrict who can share or export the Google Sheet. Rocket Statements' Google Sheets integration documents the encryption and audit controls we use and lets you control folder permissions for imported statements. Avoid posting sheets to public drives and remove editor access for users who do not need it.
⚠️ Warning: Do not store full account numbers or personal identifiers in shared sheets. Keep masked identifiers in the sheet and store raw PDFs in a secure document folder.
Read more about the security controls on our Google Sheets Integration page.
Do you provide ready-made bank statements to Sheets templates? 🗂️
Yes. Our website supplies standard mapping templates that align common bank fields to typical bookkeeping columns to reduce mapping time. Start with the standard template, test a few sample CSVs from each bank, then adapt the template for any bank-specific column names or date formats. Rocket Statements also provides prebuilt templates in the Rocket Statements Google Sheets add-on to import, map, and dedupe in a single workflow. For a template that handles multiple accounts and running balances, see Bank Statements to Google Sheets: Multi-Account Template, Deduped Imports, and Running Balances (2026 Guide).
Next steps: finalize cleaned imports and start syncing live bank data to Google Sheets.
You can keep bookkeeping accurate by standardizing headers, running a dedupe pass, and scheduling regular imports so spreadsheets match bank activity. Using a consistent import workflow prevents hours lost to reconciliation and reduces missed matches when you move a bank statement to google sheets.
If you want practical setups, follow the multi-bank live sync and PDF backfill walkthrough in our guide for automatically importing statements from multiple banks. For clean CSV imports and running balances, consult the step-by-step CSV import guide.
💡 Tip: Run deduplication before merging live sync data with CSV backfills to avoid duplicate rows and resolve mismatched headers early.
Rocket Statements is a platform that helps users save time and money by automating the process of converting their statements into spreadsheets as well as manage their documents in the cloud. Start a free trial on our Rocket Statements homepage to create your first import and set up live sync. Subscribe to our newsletter for implementation tips and updates.