
Bank Statements to Excel for Tax Preparers

Bank Statements to Excel for Tax Preparers
Manually transcribing 50 transactions per client can add 20 to 40 billable hours to a tax-preparation cycle. Bank statements to excel for tax preparers is a document-conversion workflow that turns client PDF and image statements into spreadsheet-ready transaction data for reconciliation and tax reporting. Our website compares vendor workflows and the real business cost of manual entry, showing how Rocket Statements' bank statement converter handles PDF-to-spreadsheet conversion, client portals, and team workspaces to keep formats consistent across clients. We contrast repeatable export flows, the Google Sheets add-on and the Excel add-in, and the import pain points firms face when bringing files into accounting software. Which vendor actually saves time and reduces audit risk?
How do tax preparers collect client bank and card statements using client portals?
They give each client a dedicated portal that uploads PDF or image statements directly into that client's workspace. This removes email attachments and misplaced files, so intake staff spend less time sorting and tagging. Our website's client portals store uploads in cloud folders and subfolders, making later conversion to Excel or CSV straightforward with the Bank Statement Converter.
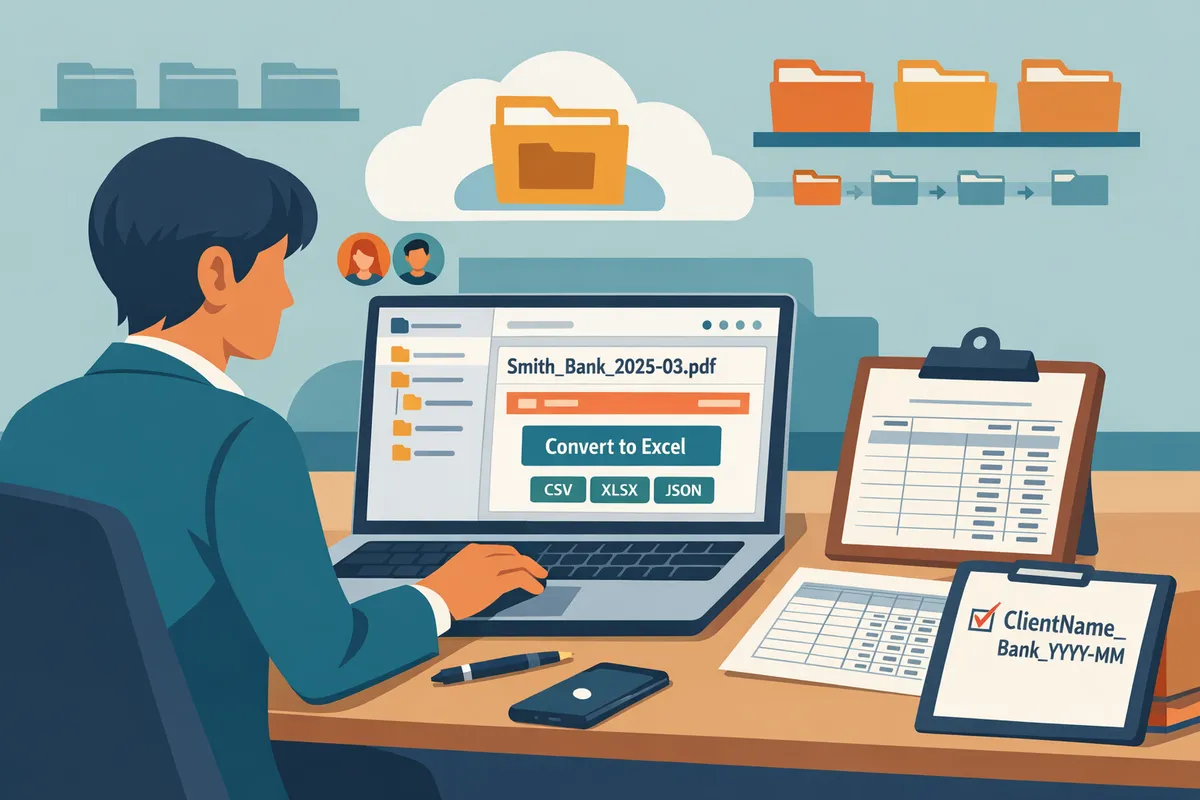
💡 Tip: Require naming conventions (ClientName_Bank_YYYY-MM) to reduce manual sorting on intake.
How do you set up per-client portals and folder routing? 📁
Create a client folder and configure uploads to land in that folder automatically. Follow these numbered steps so intake staff avoid manual routing and downstream rework:
- Create a client folder named with the firm ID and client name (FirmX_ClientName). Add subfolders for year (2025) and account type (Checking, CreditCard).
- Invite the client with the client permission role and send a short welcome message explaining the folder structure and filename rules.
- Assign at least one admin user (preparer) to the client folder so staff can review uploads and trigger conversions.
Rocket Statements supports multi-tenancy and maps uploads to the exact cloud subfolder you create. That means when a client uploads a PDF, the file appears under the correct year/account folder and is ready for batch conversion to Excel or CSV via the Bank Statement Converter. Use descriptive folder and file names to speed reconciliation later.
How do you instruct clients to submit PDFs and photographed statements? 📷
Give clients a one-page upload guide that asks for full-page PDFs or high-quality photos with good lighting. Include these specific instructions in the portal so clients produce files OCR can read without repeated follow-ups:
- Preferred: native PDF exports from the bank website or full-page scans saved as PDF. These preserve line-item detail.
- Acceptable: JPG or PNG photos that show the entire statement, straight-on, with even lighting and readable dates and balances.
- Unacceptable: cropped images, angled photos that cut off totals, or screenshots of an open banking app where text is small.
Add a sample filename template in the guide (ClientName_Bank_YYYY-MM.pdf) and two small example images: one acceptable, one unacceptable. Our client portals let you attach that one-page guide to the upload screen so clients see it before they submit. Clear guidance reduces rework during conversion and improves transaction extraction quality.
What permission model should firms use for intake security? 🔒
Use two permission levels: admin for staff and client for upload-only access. Grant admin accounts to preparers and reviewers so they can access all client folders and run conversions. Give clients a single client-level upload seat so they only see their workspace and cannot access other clients' files.
Rocket Statements stores uploaded documents in the cloud with folder-level sharing controls and supports only the admin and client permission types. That simplifies security and lowers the chance of accidental cross-client access. For added operational safety, limit who holds admin rights and document the account holders.
⚠️ Warning: Avoid instructing clients to email statements as attachments; email increases the chance of lost files and creates extra manual intake work.
Related reading: our Client Portals for Collecting Bank Statements & Financial Documents page explains portal features and workflows, and the Bank Statement Converter article shows how uploaded PDFs become spreadsheet-ready data for tax workflows.
How do you organize, accept scanned statements, and convert them to Excel while keeping originals?
Use a consistent cloud folder taxonomy, accept PDFs and high-resolution photos, convert each file to Excel or CSV, and store the original PDF next to the converted output for auditability. Rocket Statements handles the conversion and cloud storage so teams and clients share one repeatable workspace. This keeps every converted row traceable back to the source document.
⚠️ Warning: Keep the original uploaded PDF next to the converted file for audit trails and client questions.
How should you name and structure client folders for a full year of statements? 🗂️
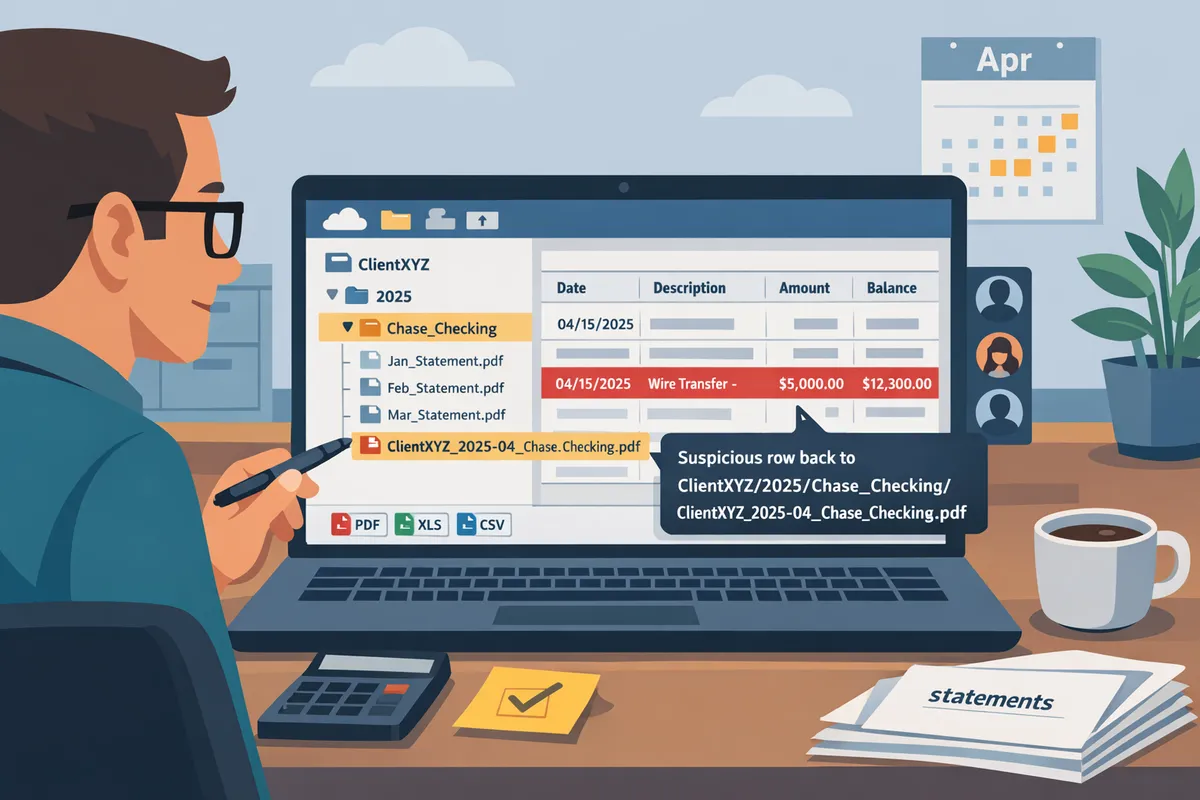
Use a simple, consistent folder structure so twelve months of statements are discoverable and mergeable later. Example folder path: ClientXYZ/2025/Chase_Checking and ClientXYZ/2025/Amex_Card. Use account-level folders so monthly files become appendable without manual re-sorting.
Recommended file-name pattern to reduce reconciliation errors:
- ClientName_YYYY-MM_Bank_AccountType_Page#.pdf
- ClientName_YYYY-MM_Bank_AccountType.xlsx
Benefits: consistent names speed batch processing in Rocket Statements, make automated merges predictable, and cut misapplied statements during review. For client portals, map each upload to the matching client workspace so documents land in the right folder automatically. See our guide on converting PDFs for tax work in the article on Tax Prep Must Have: How to Convert PDF Bank Statements to Excel/CSV Format for Taxes for naming examples and intake templates.
Can the system accept photographed or scanned statements? 📸
Yes. Rocket Statements accepts scanned PDFs and high-resolution photos (JPG, PNG) so clients who photograph paper statements can still be processed. Ask clients to upload a full-page image with all four corners visible, no heavy shadows, and correct orientation. Recommend using the phone camera at normal resolution and avoid screenshots of cropped or heavily compressed images
Practical tips to reduce extraction errors:
- Capture the entire page, not a zoomed crop.
- Place the statement on a contrasting surface and use even lighting.
- Save as PDF when possible; otherwise use a JPG or PNG with default camera settings.
These steps reduce rework and speed validation reviews.
How do you convert each statement to CSV/Excel and keep the original PDF visible? 🔁
Convert uploads into structured CSV, Excel, JSON, or QuickBooks-compatible files while retaining the original upload alongside the outputs. Rocket Statements stores the original PDF or image in the same client folder as the converted files and keeps them downloadable for reviewers.
Export options to plan for:
- CSV and Excel for spreadsheet workflows.
- JSON for system imports or data analysis.
- QBO/OFX or other QuickBooks-compatible export files for manual import into accounting software.
Operational flow: upload into client portal, Rocket Statements performs batch conversion, then the platform writes the converted file beside the original PDF so your reviewer can cross-check entries without hunting for the source. For a technical comparison of export targets and formats, see Bank Statement to CSV, Excel, JSON & QuickBooks.
How do you validate that extracted transactions match the printed statement balances? ✅
Reconcile extracted transactions to the statement’s opening and closing balances and transaction count to surface extraction errors before categorization. Validation prevents silent data drift and saves hours that would otherwise go to correcting misreads during tax mapping.
Use this quick checklist before merging or categorizing:
- Opening balance matches printed opening balance.
- Closing balance matches printed closing balance.
- Transaction count equals the number of posted rows on the statement.
- No negative/positive sign flips in amounts.
Assign a reviewer to sign off on the checklist in Rocket Statements, and add an audit note linking to the source PDF when an exception exists.
How do you combine 12 months into one clean, consistently formatted dataset? 📊
Export each monthly CSV, append them into a master workbook, normalize columns, and keep an audit column referencing the source file. Standard column set: date, description, amount, running_balance, account, source_file. This produces a single dataset ready for Schedule C mapping and tax categorization.
Step-by-step merge process:
- Export monthly CSVs from Rocket Statements into a working folder.
- Append files into one master sheet (use Excel, Google Sheets, or the Rocket Statements add-in).
- Run a normalization pass: unify date formats, convert debit/credit to signed amounts, and standardize vendor description fields.
- Add a source_file and source_page column to every row for audit tracing.
- Run the validation checklist on the merged workbook to confirm balances and transaction counts.
Keeping the source_file reference ensures you can trace any suspicious row back to ClientXYZ/2025/Chase_Checking/ClientXYZ_2025-04_Chase_Checking.pdf in seconds. For workflow templates and reconciliation checklists tailored to tax preparers, review our Bank Statement Converter for Accounting Firms article.
How does Rocket Statements support team access, exports, and downstream tax software workflows?
Rocket Statements centralizes team access while producing import-ready files for tax and accounting systems. This reduces repetitive formatting work and surfaces extraction errors before they reach your tax software. Below is a side-by-side comparison of a DIY spreadsheet concat and a Rocket Statements managed conversion.
| Criteria | DIY spreadsheet concat | Rocket Statements managed conversion |
|---|---|---|
| Accuracy checks | Manual spot checks or formula-driven balancing; missed rows often slip through. | Automatic reconciliation against the statement balances so extraction errors surface. |
| Folder organization | Local folders or mixed cloud drives with inconsistent naming. | Cloud workspaces with per-client folders, subfolders, and client portals for direct uploads. |
| Audit trail columns | Often absent or added manually (high chance of human error). | Conversion outputs include audit metadata that links rows back to the original source for reviewer traceability. |
| Supported export formats | Typically CSV or Excel exports assembled manually; inconsistent column order. | Export-ready Excel, CSV, JSON, and QuickBooks-compatible files (QBO/OFX-style exports). |
| Time and review effort | One misformatted statement can add hours of cleanup and reconciliation. | Conversion reduces formatting repetition and cuts review cycles, shifting time to reviewer validation. |
How do teams share one workspace and control access? 👥
A Rocket Statements workspace is a cloud folder structure that keeps client files, converted outputs, and sharing controls in one place. Admin accounts give your preparers and reviewers full access to per-client folders while client accounts let clients upload statements directly to the correct folder. Multi-tenancy support keeps separate client workspaces under one firm account so staff do not need to juggle multiple logins or email attachments. For example, a small CPA firm can organize Year > Client Name > Bank > Statement PDF and automatically store the converted Excel beside the original PDF for auditability.
See our client portal guide for collecting statements and routing uploads in the right folder using Rocket Statements' client portals.
What export options exist and how do you import into tax software? 📤
Rocket Statements exports Excel, CSV, JSON, and QuickBooks-compatible files that you upload into tax and accounting software yourself. The platform produces import-ready files rather than pushing transactions directly into QuickBooks or Xero, so your team retains control over mapping and final import steps. Use the Excel add-in or Google Sheets add-on to pull converted data straight into your working spreadsheet for tagging, memo updates, and Schedule C mapping. For example, convert a year of bank statements to csv, pull the CSV into a two-sheet workbook, then use the add-in to refresh converted rows after a client uploads a late statement.
For detailed export workflows and format choices, see our guide comparing CSV, Excel, JSON and QuickBooks exports.
How should firms handle review and categorization before tax form entry? 🧐
Firms should assign a reviewer to validate conversions, run a reconciliation check, and apply a consistent mapping to Schedule C categories before importing into tax forms. Create a two-sheet workbook where sheet one holds raw transactions (Date, Amount, Payee, Memo, SourceFile) and sheet two holds a mapping table that links payee keywords or GL tags to Schedule C line items. A typical reviewer workflow: 1) confirm the statement total matches the converted totals, 2) resolve any flagged extraction rows, 3) apply the mapping table, and 4) export the categorized file for import to tax software. Using a standard mapping template reduces reviewer time and improves consistency across preparers.
💡 Tip: Always run a balance reconciliation against the original statement totals before finalizing category mappings.
For a practical mapping template and reconciliation checklist tailored to tax preparers, see our tax-prep conversion guide and the accounting-firms comparison of converters.
How do you implement this tax-season workflow and measure results, plus how to start the free trial?
Implement this tax-season workflow by running a phased pilot that combines client portals, a consistent folder taxonomy, validated PDF-to-spreadsheet conversions, team review, and standardized Schedule C mapping. Measure results by tracking processing hours per statement, validation exceptions, and time-to-ready dataset so you can quantify hours saved and reconciliation reductions.
💡 Tip: Run a pilot with 5-10 clients to measure time saved and tweak folder naming before full rollout.
What is the implementation checklist for tax season? 🛠️
Run a four-phase checklist: pilot intake and folder naming, pilot conversions and validation, team training, then full rollout. Use the numbered checklist below during your pilot and expand it for firm-wide adoption.
- Pilot planning (week 0).
- Create a pilot group of 5-10 clients who already have PDFs or images ready.
- Set up client portals and test folder paths in Rocket Statements so each client uploads into their own workspace. See Client Portals for Collecting Bank Statements & Financial Documents for portal setup guidance.
- Draft a one-page upload guide that shows preferred file names, photo tips (high-res, landscape), and acceptable file types.
- Pilot execution (weeks 1-2).
- Ask pilot clients to upload 2–4 statements each (stay within the 20-page free trial allotment).
- Convert statements with Rocket Statements and export Excel/CSV outputs for review.
- Run the data-validation checklist (next section) on each converted file and record exceptions.
- Template and review build (week 2).
- Create a master year file template (master transaction sheet, mapping sheet, reconciliation checklist).
- Train reviewers on the Microsoft Excel add-in and Google Sheets add-on so exports load directly into templates.
- Full rollout (weeks 3+).
- Move all clients into the folder taxonomy and enable portal uploads.
- Track metrics continuously: processing hours per statement, validation exceptions per 100 statements, and average time-to-ready dataset.
Record these pilot KPIs: processing hours per statement, number of validation exceptions, percent of statements ready for Schedule C import without edits, and time from upload to export-ready Excel.
Data-validation checklist and QA process 🔍
Validate every converted file by reconciling extracted transactions to the statement balances and flagging exceptions before mapping to tax categories. This prevents silent extraction errors from entering client workpapers and reduces time spent on reconciliation during tax prep.
- Confirm opening and closing balances match the statement. Flag any mismatch.
- Spot-check 10% of transactions per statement against the source PDF, focusing on large amounts, deposits, and refunds.
- Verify date formatting and that multi-line descriptions collapsed into one row preserve the merchant and amount.
- Ensure debit/credit signs and currency symbols are correct; normalize negatives to a single column.
- Check for split transactions and retained check numbers where relevant.
- Add an "Exception Reason" column and classify each exception: OCR read error, multi-page split, missing page, or ambiguous description.
- Re-run conversion for files with more than 5% exceptions or submit to Rocket Statements support for review if exceptions persist.
Use the QA results to refine the folder naming rules and the client upload guide before full rollout.
What templates and mapping guides speed Schedule C and Form 1040 entry? 🧾
Use a pre-built workbook that links normalized transaction descriptions to Schedule C line items and includes reconciliation and an audit column. A structured workbook reduces per-client mapping time from hours to minutes.
Included workbook sheets and columns:
- Master Transaction sheet. Columns: Client ID, Statement File, Date, Description (normalized), Amount, Debit/Credit, Category Code, Category Label, Audit Link.
- Category Mapping sheet. Columns: Category Code, Category Label, Schedule C Line, Common Keywords (examples), Notes (e.g., "Meals 50% deductible").
- Reconciliation checklist. Items: Opening/closing balance match, sampled transaction checks, exception log, reviewer initials, date reviewed.
- Audit column. Include a direct filename reference and folder path back to the original PDF in Rocket Statements for every row.
Example mapping rows (illustrative):
- "Office Depot", "office supplies" → Schedule C line: "Office expenses".
- "Uber Eats", "client meal" → Schedule C line: "Meals" (mark 50% deductible in Notes).
- "Gasoline", "vehicle expense" → Schedule C line: "Car and truck expenses" (include odometer policy reference in Notes).
Rocket Statements exports load into this workbook via the Excel add-in or Google Sheets add-on so reviewers can normalize descriptions and apply the mapping sheet without manual copy/paste. For mapping guidance, see our article on converting PDF bank statements to Excel/CSV for taxes and the Bank Statement to CSV, Excel, JSON & QuickBooks comparison.
How do you quantify time savings and compliance benefits? 📈
Quantify savings by comparing average manual transcription time per statement with the end-to-end managed conversion time and tracking reconciliation exceptions. Use that comparison to calculate staff redeployment value and justify subscription or pay-as-you-go costs.
Example ROI scenario (illustrative):
- Manual baseline: a small preparer reports 30 billable hours per client for collecting, transcribing, and reconciling 50 transactions. For 50 clients that equals 1,500 hours.
- Managed conversion: Rocket Statements conversion + validation + 1 reviewer pass averages 1.5 hours per client. For 50 clients that equals 75 hours.
- Hours saved: 1,425 hours. At $75/hour blended staff cost, redeployment value = $106,875.
Also track non-hour KPIs: reduction in reconciliation exceptions per 100 statements, percentage of missing or misfiled PDFs, and average time from upload to export-ready dataset. Use those metrics when preparing a cost-justification memo for partners or practice managers.
How do I start the free trial and run a pilot? 🚀
Start the one-time 20-page free trial to test the end-to-end flow with real client files. Use the trial to confirm portal uploads, conversion quality, validation checks, export formats, and the Excel/Sheets add-ins before subscribing.
Pilot steps to use with the free trial:
- Create a Rocket Statements account and enable a client portal folder for a sample client.
- Distribute your upload guide and collect 2-4 statements from each pilot client, staying inside the 20-page trial limit.
- Convert the uploads, export Excel/CSV, and import into the master workbook to run the data-validation checklist.
- Measure processing hours, count validation exceptions, and collect reviewer feedback to refine templates and folder naming.
Ready to test? Try a pilot with your most representative 5–10 clients and evaluate the end-to-end workflow. For implementation details and format options, see our Bank Statement Converter page and the Client Portals for Collecting Bank Statements & Financial Documents article.
Tax Prep Must Have: How to Convert PDF Bank Statements to Excel/CSV Format for Taxes
Bank Statement to CSV, Excel, JSON & QuickBooks
Bank Statement Converter for Accounting Firms
Frequently Asked Questions
These FAQs answer the practical questions tax preparers raise about converting bank statements to spreadsheet-ready data and how Rocket Statements fits into that workflow. Use these responses to evaluate vendors, design a pilot, and estimate the operational impact on your practice.
How accurate is statement extraction for bank statements?
Accuracy depends on scan quality and statement format; validating opening and closing balances and transaction counts surfaces most extraction errors. Rocket Statements validates extracted transactions against the balances printed on the statement so firms catch mismatches before they reach reconciliation. For example, a low-resolution photo of a 12‑page combined statement will produce more exceptions than a native PDF; run a small batch during a pilot to measure your real-world error rate and adjust client intake instructions. See our comparison of managed workflows in the Bank Statement Converter for Accounting Firms to understand how error handling differs from one-off converters.
Can I upload photographed credit card statements and PDFs from clients?
Yes. Rocket Statements accepts scanned PDFs and high-resolution images (JPG, PNG) that clients upload through client portals or your workspace. Ask clients to capture full pages on a flat surface, avoid glare, and include all header/footer rows so statement balances and transaction dates are legible. Small pilots that include phone-shot images reveal the common exception types your reviewers will see, letting you tighten submission guidance.
💡 Tip: Ask clients to photograph statements in good light, save as PDF when possible, and include the entire page edge to edge to reduce extraction exceptions.
Does Rocket Statements push transactions directly into QuickBooks or Xero?
No. Rocket Statements does not push transactions into QuickBooks, Xero, or Sage; it exports QuickBooks-compatible files and other structured formats for manual import. Our exports include CSV, Excel, JSON, and QBO/OFX so you can import into your accounting workflow without manual transcription. For import best practices and a side‑by‑side view of export formats, review Bank Statement to CSV, Excel, JSON & QuickBooks.
How do I combine 12 months of statements into one CSV for categorization?
Standardize exports month by month, then append them into a master workbook with consistent column headers and a source-reference column for auditability. Export each month from Rocket Statements as CSV or Excel, use a normalized description mapping to reduce duplicate vendor names, and add a column for original statement date and source filename so you can trace every row back to the PDF. Once combined, apply your Schedule C or Form 1040 category mapping sheet and run pivot-table checks on total inflows and outflows to confirm totals match the annual bank summary.
Is client data stored in the cloud and how do I control sharing?
Yes. Rocket Statements stores uploaded documents and converted outputs in cloud folders and workspaces you control with admin and client permission levels. Use separate client workspaces and subfolders to limit access, invite team members to specific folders, and keep the original PDFs next to the converted spreadsheet for audit trails. For firms with formal compliance needs, document your folder taxonomy and retention policy before scaling so reviewers know where originals and exports live.
⚠️ Warning: Do not share login credentials or send sensitive files over unsecured email; use client portals and workspace sharing to preserve access controls and audit logs.
What should I expect during a pilot before full roll-out?
Expect to test intake, conversion quality, validation checks, folder taxonomy, and reviewer workflows on a small client sample. Run the free-trial pages on representative statements, measure time saved per client compared with manual transcription, and refine naming, mapping templates, and reviewer assignment before scaling. Use pilot results to build a reconciliation checklist that includes transaction counts, opening/closing balance checks, and category-mapping spot checks.
How fast are conversions completed?
Conversion speed depends on file size, batch volume, and queue, so times vary by workload and file type. For planning, run a small batch during your pilot to measure throughput for your mix of multi-page PDFs and phone-shot images; that gives a realistic processing time to base SLAs and staffing on. Rocket Statements supports batch processing and add-ins for Google Sheets and Excel to speed downstream review once conversions finish.
Use a managed converter to produce consistent, spreadsheet-ready transaction data.
Manual transcription adds billable hours and reconciliation risk; tax teams that move bank statements to Excel reduce cleanup time and missed deductions. For tax preparers, converting bank statements to excel for tax preparers removes repetitive entry work and produces uniform rows that reconcile faster during tax season.
See how a firm runs the workflow in our guide on converting PDF bank statements to Excel/CSV for taxes and compare tools in our explainer on bank statement to CSV, Excel, JSON & QuickBooks. Try Rocket Statements to test the process on your own files — start a free trial (one-time 20-page trial) and confirm fit with a sample client batch via the Bank Statement Converter.
💡 Tip: Ask clients to bundle a year of statements per upload so you can validate and process them in batches rather than piecemeal.
Start the Rocket Statements free trial now to evaluate accuracy and repeatability for your tax-time workflows. Subscribe to our newsletter for implementation tips and updates.